» What is Mean Stack?
- Mean Stack is an acronym for MongoDB, ExpressJS, Angular and NodeJs
- Its a user friendly JavaScript framework to create dynamic web apps.
- It uses single language i.e. JavaScript on frontend and backend which makes it efficient and modern approach to web development. So, even if developer only knows JavaScript can work on both frontend and backend.
» What are the key principles of scalable frontend architecture?
Key Principles of Scalable Frontend Architecture:
Scalable frontend architecture refers to the design and organization of frontend code that can easily accommodate growth and handle increasing complexity over time. Key principles of scalable frontend architecture include:
- Modularity: Break down the frontend codebase into smaller, reusable modules or components. Each module should have a single responsibility and be easily interchangeable.
- Component-Based Architecture: Adopt a component-based approach where UI elements are encapsulated into independent components. Components can be composed and reused throughout the application.
- Separation of Concerns: Separate presentation logic (UI), business logic, and data logic to ensure clear responsibilities and easier maintenance. For example, separate CSS files for styling, JavaScript files for behavior, and HTML files for structure.
- Scalability: Design the architecture to accommodate growth and handle increased traffic, data, and features without sacrificing performance or maintainability. Use techniques like lazy loading, code splitting, and caching to optimize performance.
- Performance Optimization: Optimize frontend performance by minimizing network requests, reducing page load times, and optimizing rendering efficiency. Use techniques like minification, compression, and asset optimization to improve performance.
- Flexibility and Extensibility: Design the architecture to be flexible and extensible, allowing for easy addition of new features, components, and integrations. Avoid tightly coupling modules and dependencies to facilitate future changes.
- Consistency and Standards: Establish coding standards, naming conventions, and architectural guidelines to ensure consistency and maintainability across the codebase. Document best practices and encourage adherence to standards.
» RDBMS vs NoSQL
- RDBMS stands for Relational Database Management System.
- NoSQL stands for Not only SQL.
- RDBMS is the structured way of storing data. i.e. fixed schema.
- NoSQL is an unstructured way to storing data. i.e. no fixed schema.
- RDBMS is vertically scalable.
- NoSQL is horizontally scalable.
- RDBMS databases are Oracle, MSSQL, MySQL, Postgress
- NoSQL databases are MongoDB, Cassandra, CouchDB, Redis, BigTable.
» What is mean by Horizontally Scaling of Database and Vertically Scaling of database?
Horizontally scaling means you scale by adding more machines into your pool of resources. Ex: MongoDB, Cassandra etc. Vertically scaling means you scale by adding more power (i.e. CPU, RAM) to an existing machine. Ex: MySQL, MSSQL etc.
» What is Node and how it works?
- Node is a open source and cross platform run time environment for executing JavaScript code outside of a browser.
- So basically node server executes the JavaScript code not the browser.
- Node run time uses V8 engine and C++ program to execute JavaScript.
- How Node Works:
- Node applications are asynchronous by default.
- In node we have a single thread to handle all the requests. So when the requests arrives, that single thread is used to handle all those.
Example: "If we send a request to database, our thread doesn't have to wait for the database to return the data. While database is executing query same thread will be used to serve another request. When the database returns the result it puts a message in the Event Queue. Node continuously monitors this event queue in background and when it finds event in the queue it takes it process it".
» Is nodejs a programming language?
No, Node.js is not a programming language. Node.js is a runtime environment for executing JavaScript code on the server-side, and JavaScript is the programming language that is used to write code for Node.js.
JavaScript is a high-level programming language that is used to create dynamic web pages and web applications. It is primarily used in client-side development, running in web browsers to manipulate web page content and behavior. However, with Node.js, JavaScript can also be used for server-side development, allowing developers to write full-stack web applications using a single programming language.
Node.js provides a set of built-in modules that make it easier to work with files, network sockets, and other resources on the server-side. It also includes a package manager called npm (Node Package Manager) that makes it easy to install and manage third-party libraries and modules.
So, while Node.js is not a programming language itself, it is a powerful and flexible runtime environment that allows developers to use JavaScript on the server-side to create scalable and efficient web applications.
» What is server-side runtime environment?
A server-side runtime environment is a software environmt in which server-side applications run. This environment includes a set of libraries, frameworks, and tools that provide a runtime for executing server-side code. The server-side runtime environment is responsible for handling requests from clients and returning responses to clients.Examples of server-side runtime environments include:
Node.js: Node.js is a server-side runtime environment built on the V8 JavaScript engine. It provides an event-driven, non-blocking I/O model that makes it efficient for building scalable network applications.
Ruby on Rails: Ruby on Rails is a web application framework written in the Ruby programming language. It provides a runtime environment for server-side applications and includes features such as a routing system, database access, and templating.
Java EE: Java EE is a platform for building enterprise-level applications in Java. It provides a runtime environment for server-side applications and includes features such as servlets, JavaServer Pages (JSP), and Enterprise JavaBeans (EJB).
These server-side runtime environments provide a powerful and flexible platform for building scalable and efficient server-side applications.
» What is V8 JavaScript engine?
The V8 JavaScript engine is an open-source JavaScript engine developed by Google. It is written in C++ and is used to execute JavaScript code in the Google Chrome browser, as well as in other applications and tools. The V8 engine is designed to be fast and efficient, and it uses various techniques to optimize the performance of JavaScript code. For example, it compiles JavaScript code into machine code rather than interpreting it, which makes it faster to execute. It also uses just-in-time (JIT) compilation to dynamically optimize frequently executed code.
The V8 engine provides a number of features that make it a popular choice for developers, including:
High performance: The V8 engine is designed to execute JavaScript code quickly, making it a good choice for applications that require high performance.
Memory management: The V8 engine uses a garbage collector to manage memory, which reduces the risk of memory leaks and other memory-related issues.
Cross-platform support: The V8 engine can be used on a variety of platforms, including Windows, Mac, Linux, and Android.
Easy integration: The V8 engine is designed to be easy to integrate into other applications and tools, making it a popular choice for building custom JavaScript runtimes.
In addition to being used in the Google Chrome browser, the V8 engine is also used in other applications and tools, including the Node.js runtime, the Electron framework for building desktop applications, and the Deno runtime for building server-side applications in JavaScript and TypeScript.
» Is nodejs multithreaded?
Node.js is technically not multithreaded in the traditional sense, as it uses a single thread to execute JavaScript code. However, Node.js does support asynchronous programming techniques, such as callbacks, promises, and async/await, that allow developers to write code that can handle multiple I/O operations concurrently without blocking the execution of other tasks.
Node.js achieves this concurrency through its event-driven architecture and the use of the event loop. When an I/O operation is initiated, Node.js registers a callback function to handle the operation's completion. While the I/O operation is in progress, Node.js can continue to execute other code, and when the operation completes, the registered callback function is added to the event loop for execution.
This means that while Node.js is not truly multithreaded, it can still handle multiple I/O operations concurrently and provide scalable performance for server-side applications. In addition, Node.js can make use of multiple threads for certain operations, such as file I/O, by using worker threads or child processes to execute code in separate threads.
Node.js provides a cluster module that allows you to create child processes that can share the same port, allowing you to take advantage of multiple CPU cores for handling incoming requests. Each child process runs on a separate thread, allowing you to handle multiple requests concurrently.
const cluster = require('cluster');
const http = require('http');
const numCPUs = require('os').cpus().length;

if (cluster.isMaster) {
  console.log(`Master ${process.pid} is running`);

  // Fork workers
  for (let i = 0; i < numCPUs; i++) {
    cluster.fork();
  }

  cluster.on('exit', (worker, code, signal) => {
    console.log(`worker ${worker.process.pid} died`);
  });
} else {
  // Worker processes have access to the shared server
  http.createServer((req, res) => {
    res.writeHead(200);
    res.end('hello world\n');
  }).listen(8000);

  console.log(`Worker ${process.pid} started`);
}
In this example, the cluster.isMaster check is used to determine whether the current process is the master process or a worker process. If it is the master process, it forks the desired number of worker processes and listens for exit events.
Each worker process then creates an HTTP server and listens on port 8000 for incoming requests. Because each worker process runs on a separate thread, they can handle incoming requests concurrently, allowing for better performance and scalability.
Note that while the cluster module allows you to take advantage of multiple CPU cores, it does not provide true multithreading. Each worker process still uses a single thread to execute JavaScript code, but they can handle multiple requests concurrently using asynchronous I/O operations.
Worker Threads: Another way to take advantage of multiple threads in Node.js is to use the worker_threads module, which allows you to create true multithreaded applications in Node.js.
The worker_threads module provides a way to create separate Node.js threads that can communicate with each other using message passing. Each thread has its own event loop and can execute JavaScript code independently of the main thread.
Here's an example of using the worker_threads module to create a multithreaded application that calculates the sum of an array of numbers:
const { Worker, isMainThread, parentPort, workerData } = require('worker_threads');

if (isMainThread) {
  // This is the main thread
  const numCPUs = require('os').cpus().length;
  const nums = Array.from({ length: 10000000 }, (_, i) => i + 1);
  const chunkSize = Math.ceil(nums.length / numCPUs);
  const workers = [];

  for (let i = 0; i < numCPUs; i++) {
    const worker = new Worker(__filename, {
      workerData: {
        start: i * chunkSize,
        end: (i + 1) * chunkSize,
        nums: nums.slice(i * chunkSize, (i + 1) * chunkSize)
      }
    });
    workers.push(worker);

    worker.on('message', (msg) => {
      console.log(`Worker ${worker.threadId}: Sum is ${msg}`);
    });

    worker.on('error', (err) => {
      console.error(`Worker ${worker.threadId} error: ${err}`);
    });

    worker.on('exit', (code) => {
      if (code !== 0) {
        console.error(`Worker ${worker.threadId} exited with code ${code}`);
      }
    });
  }

  for (let worker of workers) {
    worker.postMessage('calculate');
  }
} else {
  // This is a worker thread
  const sum = workerData.nums.reduce((acc, n) => acc + n, 0);
  parentPort.postMessage(sum);
}
In this example, the main thread creates an array of numbers and divides it into chunks based on the number of available CPU cores. It then creates a new worker thread for each CPU core and passes a slice of the array to each worker as workerData.
Each worker then calculates the sum of its slice of the array and sends the result back to the main thread using parentPort.postMessage(). The main thread listens for message events from each worker and logs the final result.
This approach allows you to take full advantage of multiple CPU cores in Node.js and can significantly improve the performance of CPU-bound tasks. However, it's important to note that creating too many worker threads can actually degrade performance, so it's important to strike a balance between using multiple threads and avoiding excessive overhead.
» What is a module in NodeJS?
A module is a reusable block of code that encapsulates related functionality and can be loaded into other files using the require() function in NodeJS. Modules help to keep the code organized, modular, and easy to maintain.
» How to create a module in NodeJS?
To create a module in NodeJS, you need to export a function, object, or a variable from a file using the module.exports object. Here is an example:
// greet.js
module.exports = {
  greet: function(name) {
    console.log(`Hello, ${name}!`);
  }
};
You can then load this module into another file using the require() function:
// app.js
const greet = require('./greet');

greet('John'); // Output: Hello, John!
» Callback function in Node JS:
Callback is a function which gets called when the result of an asynchronous operation is ready.
Example:
// calling a getUser function
getUser(101, function(user){
 console.log('user id', user.id);
  console.log('user name', user.username);
});

function getUser(userId, callback){
 setTimeout(function(){
   callback({id:userId, username: "KJ"}); // callback function
  },2000);
}
» What is Callback Hell in Node JS:
- Callback hell means nested callback functions
- Callback hell a.k.a. Pyramid doom
Example:
getUser(param1, function(err, paramx){
    getUserDepartment(paramx, function(err, result){
        insertSomeData(result, function(err){
            doSomeAnotherOperation(someparameter, function(s){
                againDosomethingElse(function(x){
                });
            });
        });
    });
});
» What is difference between callbacks and promises:
- Callbacks are simply functions in JavaScript which are to be called and then executed after the operation of an asynchronous function has finished.
- In JavaScript functions itself considered as an Objects, so we all know that we can pass objects to another function as an argument, similarly we can pass functions as an argument to another functions.
- setTimeout() is an example.
- Promises are nothing but a much more improvised approach of handling asynchronous code as compare to callbacks.
- Promises received two callbacks in constructor function: resolve and reject.
- The resolve callback is used when the execution of promise performed successfully and the reject callback is used to handle the error cases.
- The result of the computation might be that either the promise is fulfilled with value or rejected with a reason.
» What is difference between Promises and Observables
- Promises:
- Promises handles single event when asyc operation completes or fails.
- If promises gets resolved then it returns a single value.
- If promises gets rejected then it return an error.
- Promises are not cancellable, means, if we initiate any promise request we cannot cancel it.
- In Promises if request gets failed then we cannot retry it.
- Promises are part of JavaScript.
- Observable:
- Observable is an array or sequence of event over time.
- Observable works on streams of data.
- Obsevable allows us to pass zero or more events where the callback is called for each event.
- Unlike Promises obsevable are cancellable. We can do it by cancelling subscription.
- If the request gets failed then we can retry it using retry() method.
» What is Mongoose in Node JS.
- Mongoose in a JavaScript framework commonly used in Node.js applications.
- It works a an ODM (Object Data Modeler) for Node applications.
- Using mongoose we can easily implement validations and query API so that we can interact with MongoDB database.
- It allows you to define objects with a strongly typed schema that is mapped to a MongoDB document.
- Mongoose works with below schema types:
- Number, String, Date, Buffer, Boolean, Mixed, Array, Object.
// Install mongoose
npm install mongoose --save

// Add mongoose package in your node.js file
var mongoose = require('mongoose');

// Connect with mongoose
mongoose.connect('mongodb://localhost/dbname');
» Some important NodeJS packages for your application? (WIP)
const config = require('config'); // Manage the npm configuration files
const path = require('path'); // Path module provides utilities for working with file and directory paths
const logger = require('morgan'); // HTTP request logging moddleware. generates request logs
const cookieParser = require('cookie-parser'); // Extract cookies and puts cookie info in req obj
const bodyParser = require('body-parser'); // Extract body portion of request stream & exposes it on req.body
const bluebird = require('bluebird'); // Javascript promise library
const mongoose = require('mongoose'); // Object data modelling library for nodejs and mongodb
» What is middleware in ExpressJS?
Middleware is a function that sits between the client and the server and can intercept and modify the incoming request or the outgoing response. Middleware functions can be used for logging, authentication, error handling, and more.
» How to use middleware in ExpressJS?
const express = require('express');
const app = express();

// Middleware function
const logger = (req, res, next) => {
  console.log(`${req.method} ${req.url}`);
  next(); // Call the next middleware function
};

app.use(logger); // Use the middleware function

app.get('/', (req, res) => {
  res.send('Hello, World!');
});

app.listen(3000, () => {
  console.log('Server running at http://localhost:3000/');
});
» How to use middleware in ExpressJS?
To use middleware in ExpressJS, you can use the app.use method. Here is an example:
const express = require('express');
const app = express();

app.use((req, res, next) => {
  console.log(`Received request for ${req.url}`);
  next();
});

app.use(express.static('public'));

app.listen(3000, () => {
  console.log('Server started on port 3000');
});
This code defines two middleware functions: one that logs the URL of each request, and one that serves static files from the public directory. The app.use method is used to add these middleware functions to the Express application.
» How to handle form data in ExpressJS?
To handle form data in ExpressJS, you can use the body-parser middleware. Here is an example:
const express = require('express');
const bodyParser = require('body-parser');
const app = express();

// Use body-parser middleware
app.use(bodyParser.urlencoded({ extended: false }));

app.get('/', (req, res) => {
  res.send(`
    <form method="post" action="/submit">
      <input type="text" name="name" placeholder="Name">
      <button type="submit">Submit</button>
    </form>
  `);
});

app.post('/submit', (req, res) => {
  const name = req.body.name;
  res.send(`Hello, ${name}!`);
});

app.listen(3000, () => {
  console.log('Server running at http://localhost:3000/');
});
» How to use streams in NodeJS?
Streams are a powerful tool in NodeJS that allow you to process data piece by piece, rather than loading the entire data into memory at once. There are four types of streams in NodeJS: Readable, Writable, Duplex, and Transform. Here is an example of using a Readable stream to read a file:
const fs = require('fs');

const readStream = fs.createReadStream('myfile.txt');

readStream.on('data', (chunk) => {
  console.log(`Received ${chunk.length} bytes of data.`);
});

readStream.on('end', () => {
  console.log('Finished reading file.');
});
» Explain HTTP status codes
HTTP status codes indicate whether a request has been successfully completed. They are grouped into five ranges, each of which defines where the error occurred and the number of which defines the error itself:
1XX: Informational codes, which indicate that the server is acknowledging and processing the request
2XX: Success codes, which indicate that the server has successfully received, understood, and processed the request
3XX: Redirection codes, which indicate that the server has received the request but there is a redirect to somewhere else
4XX: Client error codes, which indicate that the server could not find or reach the page or website
5XX: Server error codes, which indicate that the client made a valid request but the server was unable to complete it
» What are the HTTP codes to describe an attempt to access retricted resources
401 Unauthorized: The request requires user authentication. This status is sent when authentication is possible but has failed or has not yet been provided.
403 Forbidden: The server understands the request but refuses to authorize it. This is used when the server knows the identity of the client but does not have permission to access the resource.
» What is Angular framework? How Angular works?
Angular is an open-source front-end web application framework that is maintained by Google. It is designed to simplify the process of building dynamic, single-page web applications (SPAs) and mobile applications.
Angular works by allowing developers to use declarative templates to create HTML pages that can be extended with dynamic content and functionality. This is achieved through a combination of features, including:
Components: Angular applications are built using components, which are reusable code modules that define the behavior and appearance of a part of a web page.
Directives: Directives are attributes that can be added to HTML elements to provide additional functionality, such as data binding or event handling.
Services: Services are a way to share data and functionality across multiple components in an application.
Dependency Injection: Angular uses dependency injection to manage dependencies between different components and services.
Routing: Angular provides a powerful routing system that allows developers to create complex, single-page applications with multiple views.
Angular is built using TypeScript, a superset of JavaScript that provides additional features such as type checking and classes. TypeScript allows developers to write cleaner and more maintainable code, and provides additional tools for debugging and development.
Overall, Angular provides developers with a powerful set of tools for building modern web applications that are fast, responsive, and easy to maintain.
» How angular works internally?
Angular works by using a combination of features and tools that work together to create a dynamic, responsive web application. Here are some of the key components of Angular's internal workings:
The Angular Compiler: Angular uses a compiler to translate templates and component metadata into executable code that can be run in the browser. This allows Angular to optimize performance and minimize the amount of work that needs to be done at runtime.
Change Detection: Angular uses a technique called change detection to track changes in the application's state and update the UI accordingly. When a change is detected, Angular updates the affected parts of the UI automatically, without the need for manual intervention.
Dependency Injection: Angular uses dependency injection to manage dependencies between components and services. This allows components and services to be easily replaced or modified without affecting the rest of the application.
RxJS: Angular makes extensive use of the Reactive Extensions for JavaScript (RxJS) library to handle asynchronous data streams and events. RxJS provides a powerful and flexible way to manage complex data flows in Angular applications.
Angular Modules: Angular applications are organized into modules, which are collections of related components, services, and directives. Modules allow developers to compartmentalize their code and make it easier to manage and maintain.
Angular CLI: The Angular Command Line Interface (CLI) is a tool that provides developers with a streamlined way to create, test, and deploy Angular applications. The CLI automates many common development tasks and provides a consistent development experience across different projects.
Overall, Angular's internal workings are designed to provide developers with a powerful and flexible set of tools for building modern web applications that are fast, responsive, and easy to maintain.
» How to improve performance of Angular application?
Angular is a great framework but its large as well, and not making it optimized end up performance issues. So there are multiple ways to improve performance of our angular app. Example:
- AOT Compilation for production builds
- Lazy loading of modules
- Minification
- OnPush change detection if the application is big
- Use of module bundlers
- To avoid function call from templates
- Pure Pipes
- Unsubscribe observable
Read below article for more details:
https://angular-guru.com/blog/angular-performance-tips
https://github.com/mgechev/angular-performance-checklist
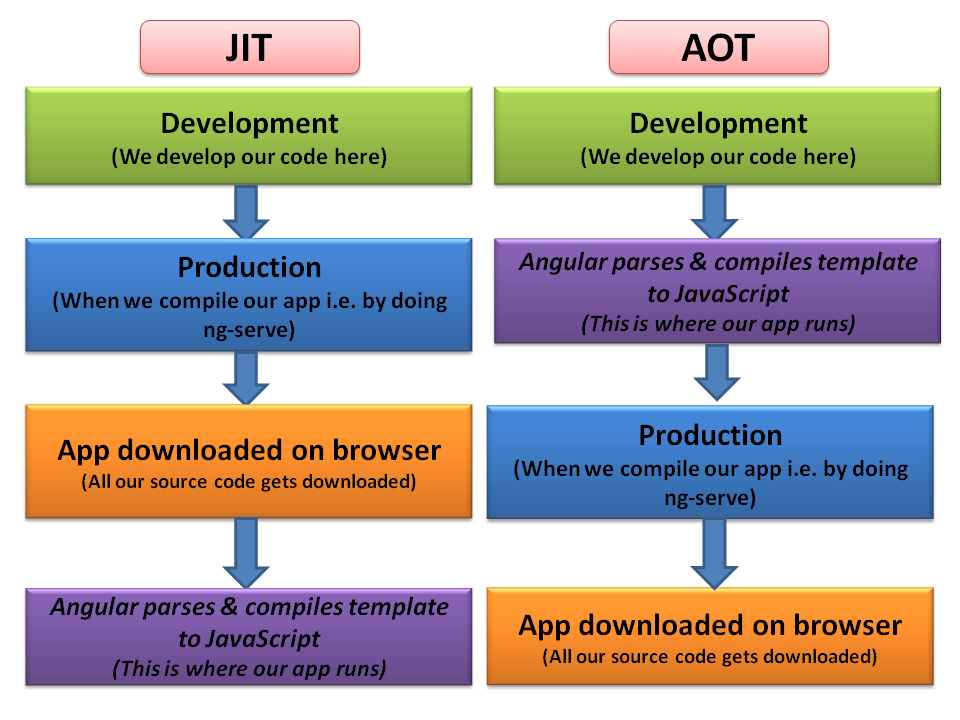
» Angular Compilation : AOT vs JIT
Angular offers two types of code compilation i.e. AOT and JIT.
What is mean by code compilation in angular: Well it DOES NOT MEAN COMPILING TYPESCRIPT INTO JAVASCRIPT because that is job of CLI. Angular also needs to compile our templates i.e. html dom, so it first parses these html files and compiles it into JavaScript because accessing JavaScript is faster than accessing HTML DOM.
JIT:
- JIT stands for Just in Time compilation
- It compiles our code i.e. HTML and TypeScript on browser at runtime hence performance wise its slow.
- For JIT you don't need to build after changing your code or before reloading the browser page which is suitable for local env while development.
Commands :
ng build, ng serve
AOT:
- AOT stands for Ahead of Time compilation.
- It compiles at the build time i.e. machine itself does the compilation process via command line.
- It is suitable mainly for production build as you don't need to deploy compiler.
- It is secure, original source code node disclosed.
- Detect template errors earlier.
- Commands :
ng build --aot, ng serve --aot, ng build --prod
» Angular lifecycle hooks?
Angular components goes through different phases from being created and destroyed. These phases are called as Angular Lifecycle Hooks. Following are the orders in which different phases happen.
- ngOnChanges() - calls when Angular sets or re-sets the data-bound properties. Called before ngOnInit() and whenever one or more data-bound input properties change.
- ngOnInit() - called when Angular initializes the Component. It is called only once.
- ngDoCheck() - Detect and act upon changes that Angular can't or won't detect on its own. It is called immediately after ngOnChanges() and ngOnInit().
- ngAfterContentInit() - Respond after Angular projects external content into the component's view. It is a Component only hook and can not be called for a directive.
- ngAfterContentChecked() - Respond after Angular checks the content projected into the component. Called after the ngAfterContentInit(). It will also be called every subsequent ngDoCheck(). This is a Component-only hook.
- ngAfterViewInit() - Respond after Angular initializes the component's views and child views. This is a Component-only hook.
- ngAfterViewChecked() - Respond after Angular checks the component's views and child views. A component-only hook.
- ngOnDestroy() - Called just before Angular destroys the directive/component. This is the place we can unsubscribe observables and detach event handlers to avoid memory leaks.
» Why constructor is required if onInit() is there in Angular?
Constructor:
The constructor is a standard TypeScript feature used for initializing class instances and setting up dependencies. It's executed when an instance of the class is created, typically by Angular's dependency injection system. In Angular components, the constructor is primarily used for injecting dependencies via constructor parameters, such as services or other components. It's also where you can perform basic initialization tasks that don't depend on Angular's lifecycle hooks, such as initializing properties or configuring class variables.
Example:
Consider a user management component in an Angular application. In the constructor, you might inject a UserService dependency to fetch user data from the server. Additionally, you might initialize component properties or configure default settings.
import { Component } from '@angular/core';
import { UserService } from './user.service';

@Component({
  selector: 'app-user-management',
  templateUrl: './user-management.component.html',
  styleUrls: ['./user-management.component.css']
})
export class UserManagementComponent {
  users: User[];

  constructor(private userService: UserService) {
    // Initialize properties or perform basic setup
    this.users = [];
  }

  // Other component methods and lifecycle hooks...
}
ngOnInit():
The ngOnInit() method is an Angular lifecycle hook that is called after Angular has initialized all data-bound properties of a directive or component. It's typically used to perform initialization tasks specific to Angular components, such as fetching initial data from services, subscribing to observables, or initializing component state. Unlike the constructor, ngOnInit() is Angular-specific and is called as part of Angular's component lifecycle, making it suitable for tasks that require access to Angular-specific features or dependencies.
Example:
Continuing with the user management example, in the ngOnInit() method, you might fetch initial user data from the UserService and initialize the users array. This ensures that the component is fully initialized before performing any data-fetching operations.
import { Component, OnInit } from '@angular/core';
import { UserService } from './user.service';

@Component({
  selector: 'app-user-management',
  templateUrl: './user-management.component.html',
  styleUrls: ['./user-management.component.css']
})
export class UserManagementComponent implements OnInit {
  users: User[];

  constructor(private userService: UserService) {}

  ngOnInit(): void {
    // Fetch initial user data from the UserService
    this.userService.getUsers().subscribe((users) => {
      this.users = users;
    });
  }

  // Other component methods...
}
If you perform data-fetching tasks, such as calling the getUsers() method, directly in the constructor instead of the ngOnInit() method in an Angular component, it may lead to unexpected behavior and potential issues.
Here's what would happen:
- Early Execution: When you fetch data in the constructor, it gets executed as soon as the component is instantiated.
This means that the data-fetching operation will occur before Angular has finished initializing the component and its data-bound properties.
- Potential Race Conditions: If the data-fetching operation involves asynchronous tasks, such as HTTP requests, there's a risk of race conditions.
Since the constructor does not wait for asynchronous operations to complete, the component's properties may not be fully initialized when the data arrives.
This can lead to undefined or unexpected behavior when accessing component properties bound to the fetched data.
- Violation of Angular Lifecycle: Angular's lifecycle hooks, such as ngOnInit(), exist to provide a standardized way to perform initialization tasks after Angular has initialized component properties.
By performing data-fetching tasks in the constructor, you're bypassing Angular's lifecycle and violating best practices for component initialization.
- Potential Performance Issues: Fetching data in the constructor may lead to unnecessary overhead and performance issues, especially if the data-fetching operation is expensive or resource-intensive.
This can impact the initial rendering performance of the component and may cause delays in displaying the component's content.
In summary, while it's technically possible to fetch data in the constructor, it's generally not recommended in Angular applications. Instead, using the ngOnInit() lifecycle hook ensures that data-fetching tasks occur at the appropriate stage of the component lifecycle, avoiding potential issues related to race conditions, Angular lifecycle violations, and performance overhead.
» What are the difference between Renderer and ElementRef in Angular 4?
The Renderer in Angular is a class that is an abstraction over the DOM. Using the Renderer for manipulating the DOM doesn't break server-side rendering or Web Workers (where direct access to the DOM would break).
For example, if we want to focus an input element, we could use template reference variable and with the help of @ViewChild decorator we can access the native DOM. But we are actually depending the native DOM and lose the opportunity to be able to run our script also in no-DOM environments like native mobile or Web workers. Remember that Angular is a platform, and the browser is just one option for where we can render our app.
import { Directive, Renderer, ElementRef } from '@angular/core';
@Directive({
  selector: '[exploreRenderer]'
})
export class ExploreRendererDirective {
  private nativeElement : Node;
  constructor( private renderer : Renderer, private element : ElementRef ) {
    this.nativeElement = element.nativeElement;
  }
}

//Where ever we want to use the native DOM, we could use this directive on the element like <div exploreRenderer></div>
ElementRef is a class that can hold a reference to a DOM element. This is again an abstraction to not break the environments where the browsers DOM isn't actually available. If ElementRef is injected to a component, the injected instance is a reference to the host element of the current component.
There are other ways to acquire an ElementRef instance like @ViewChild(), @ViewChildren(), @ContentChild(), @ContentChildren(). In this case ElementRef is a reference to the matching element(s) in the template or children.
Renderer and ElementRef are not "either this or that", but instead they have to be used together to get full platform abstraction.
Renderer acts on the DOM and ElementRef is a reference to an element in the DOM the Renderer acts on.
» What is the difference between @Inject and @Injectable?
@Inject:
The @Inject decorator is used to specify a dependency token when injecting a service or a value into a component, directive, or another service.
It allows you to manually specify the provider token to be used for dependency injection when there are multiple providers available for the same type.
You typically use @Inject when you have multiple tokens providing the same type, and you want to specify which one to use.
It's commonly used in conjunction with Angular's dependency injection system to resolve dependencies when there are token conflicts or when you want to inject a value from a different provider.
import { Injectable, Inject } from '@angular/core';
import { TOKEN_NAME } from './constants';

@Injectable()
export class MyService {
  constructor(@Inject(TOKEN_NAME) private myToken: any) { }
}
@Injectable:
The @Injectable decorator is used to define a class as a service that can be injected into other components, directives, or services.
It marks a class as eligible for dependency injection by Angular's injector.
When a class is decorated with @Injectable, Angular's dependency injection system can create instances of that class and inject them where needed.
It's commonly used to define services, which are singletons in Angular and can provide functionality that can be shared across multiple components.
import { Injectable } from '@angular/core';

@Injectable()
export class MyService {
  constructor() { }

  // Service methods go here
}
In summary, @Inject is used to specify a dependency token for a specific injection point, while @Injectable is used to mark a class as a service that can be injected into other parts of your Angular application.
» What is Change Detection in Angular? How it is improved from Angular 1.x?
Change detection is the process that allows Angular to keep our views in sync with our models. In Angular 1, we have two-way data bindings and have a long list of watchers that needed to be checked every-time a digest cycle was started. This was called dirty checking and it was the only change detection mechanism available.
In Angular, the flow of information is unidirectional, even when using ngModel to implement two way data binding. In this new version, our code is responsible for updating the models. Angular is only responsible for reflecting those changes in the components and the DOM by means of the selected change detection strategy.
By default, Angular defines a certain change detection strategy for every component in our application. To make this definition explicit, we can use the property changeDetection of the @Component decorator. Angular provides two Change Detection Strategies:
ChangeDetectionStrategy.Default - The default strategy for the change detection is to traverse all the components of the tree even if they do not seem to have been modified.
ChangeDetectionStrategy.OnPush - This instructs Angular to run change detection on these components and their sub-tree only when new references are passed to them versus.
Below is the example code for default change detection:
//app.component.ts

import { Component } from '@angular/core';

@Component({
  selector: 'app-root',
  templateUrl: './app.component.html'
})
export class AppComponent {
  fruits = ['Banana', 'Apple', 'Orange'];

  addFruit(fruit) {
    this.fruits.push(fruit);
  }
}
<input #newFruit type="text" placeholder="Enter a fruit">
<button (click)="addFruit(newFruit.value)">Add fruit</button>

<app-child [items]="fruits"></app-child>
Child component
import { Component, Input } from '@angular/core';

@Component({
  selector: 'app-child',
  templateUrl: './child.component.html'
})
export class ChildComponent {
  @Input() items: string[];
}
Child component's template:
<ul>
<li *ngFor="let item of items">{{ item }}</li>
</ul>
Angular creates change detector classes at runtime for each component, and keep track of the previous values to check with the new value whenever a change is detected. If we add a fruit in the parent component it will get reflected in the child immediately. The OnPush strategy is different that it will only run the change detection when the component's state is mutated. The same child component with this strategy is as follow:
import { Component, Input, ChangeDetectionStrategy } from '@angular/core';

@Component({
  selector: 'app-child',
  templateUrl: './child.component.html',
  changeDetection: ChangeDetectionStrategy.OnPush
})
export class ChildComponent {
  @Input() items: string[];
}
Now if we add a fruit in the parent component, it will not be updated in the child. Because the child component is receiving the same array reference every time. In order to make this work, we need to pass the new reference of fruits array every time we change it.
//app.component.ts
addFruit(fruit) {
  this.foods = [...this.fruits, fruit];
}
Now everything is working fine because Angular able to identify new reference and can run the change detection. OnPush change detection is very useful when our application has lot of components as it will boost the application performance.
» What is Interpolation?
Interpolation is a special syntax in Angular which binds the properties we defined in our component into the template. It is represented by double curly braces {{}}. Angular converts property name into string value of the corresponding component property.
Example:
    <div>
      {{name}}
      <img src="{{imageUrl}}" alt="{{imageTitle}}>
    </div>
» What are the Decorators in Angular?
Decorators are the new features of TypeScript and they are used throughout in Angular (2+). Decorators are nothing but a functions and as per the documentation in TypeScript decorators are special kind of declarations that can be attached to class or method.
There are 5 types of decorators:
- Class Decorator
- Method Decorator
- Property Decorator
- Accessor Decorator
- Parameter Decorator
In Angular, a decorator is a design pattern that allows you to enhance or modify the behavior of classes, methods, or properties at runtime without changing their source code. Decorators are typically functions that take one or more arguments and return a function, which is then applied to the target object. In Angular, decorators are often used with classes, components, directives, services, and dependency injection.
Imagine you're building an e-commerce website with Angular, and you have a component called ProductComponent that displays product details. You want to enhance the functionality of this component by adding logging capabilities whenever a user interacts with it.
import { Component } from '@angular/core';

@Component({
  selector: 'app-product',
  templateUrl: './product.component.html',
  styleUrls: ['./product.component.css']
})
export class ProductComponent {
  productName: string = 'iPhone 13';
  productPrice: number = 999;

  constructor() { }

  addToCart(): void {
    console.log(`Product added to cart: ${this.productName}`);
    // Add logic to add product to cart
  }

  buyNow(): void {
    console.log(`Product purchased: ${this.productName}`);
    // Add logic to complete purchase
  }
}
Now, let's say you want to log a message every time the addToCart() and buyNow() methods are called. Instead of adding logging code directly into these methods, you can use decorators to dynamically enhance their behavior.
import { Component } from '@angular/core';

// Decorator function to log method calls
function logMethod(target: any, propertyKey: string, descriptor: PropertyDescriptor): void {
  const originalMethod = descriptor.value;

  descriptor.value = function (...args: any[]) {
    console.log(`Method called: ${propertyKey}`);
    const result = originalMethod.apply(this, args);
    return result;
  };
}

@Component({
  selector: 'app-product',
  templateUrl: './product.component.html',
  styleUrls: ['./product.component.css']
})
export class ProductComponent {
  productName: string = 'iPhone 13';
  productPrice: number = 999;

  constructor() { }

  @logMethod
  addToCart(): void {
    // Add logic to add product to cart
  }

  @logMethod
  buyNow(): void {
    // Add logic to complete purchase
  }
}
In this example:
We define a decorator function called logMethod() that takes the target object, property key, and property descriptor as arguments.
Inside the decorator function, we replace the original method with a new function that logs a message before calling the original method.
We apply the logMethod decorator to the addToCart() and buyNow() methods using the @ syntax.
Now, whenever the addToCart() or buyNow() methods are called, a message will be logged to the console indicating that the method was called. This demonstrates how decorators can be used to enhance or modify the behavior of methods in Angular components.
» Lets see example of all decorators
### Class Decorator:
A class decorator is applied to a class declaration and can be used to modify or enhance the behavior of the class.
Example:
function logClass(target: any) {
  console.log('Class decorator invoked:', target);
}

@logClass
class MyClass {
  constructor() {
    console.log('MyClass instantiated');
  }
}
In this example, the `logClass` function acts as a class decorator. It is applied to the `MyClass` declaration using the `@` syntax. When `MyClass` is instantiated, the class decorator is invoked, and the target parameter receives a reference to the constructor function of the class.
### Method Decorator:
A method decorator is applied to a method within a class and can be used to modify or enhance the behavior of that method.
Example:
function logMethod(target: any, propertyKey: string, descriptor: PropertyDescriptor) {
  console.log('Method decorator invoked for method:', propertyKey);
}

class MyClass {
  @logMethod
  myMethod() {
    console.log('Executing myMethod');
  }
}
In this example, the `logMethod` function acts as a method decorator. It is applied to the `myMethod` method using the `@` syntax. When `myMethod` is called, the method decorator is invoked, and the target, propertyKey, and descriptor parameters receive information about the method being decorated.
### Property Decorator:
A property decorator is applied to a property within a class and can be used to modify or enhance the behavior of that property.
Example:
function logProperty(target: any, propertyKey: string) {
  console.log('Property decorator invoked for property:', propertyKey);
}

class MyClass {
  @logProperty
  myProperty: string = 'Hello';
}
In this example, the `logProperty` function acts as a property decorator. It is applied to the `myProperty` property using the `@` syntax. When the class is instantiated, the property decorator is invoked, and the target and propertyKey parameters receive information about the property being decorated.
### Accessor Decorator:
An accessor decorator is applied to a getter or setter within a class and can be used to modify or enhance the behavior of that accessor.
Example:
function logAccessor(target: any, propertyKey: string, descriptor: PropertyDescriptor) {
  console.log('Accessor decorator invoked for accessor:', propertyKey);
}

class MyClass {
  private _myProperty: string = 'Hello';

  @logAccessor
  get myProperty(): string {
    return this._myProperty;
  }

  @logAccessor
  set myProperty(value: string) {
    this._myProperty = value;
  }
}
In this example, the `logAccessor` function acts as an accessor decorator. It is applied to both the getter and setter of the `myProperty` property using the `@` syntax. When the getter or setter is called, the accessor decorator is invoked, and the target, propertyKey, and descriptor parameters receive information about the accessor being decorated.
### Parameter Decorator:
A parameter decorator is applied to a parameter declaration within a method or constructor and can be used to modify or enhance the behavior of that parameter.
Example:
function logParameter(target: any, propertyKey: string, parameterIndex: number) {
  console.log('Parameter decorator invoked for parameter:', parameterIndex);
}

class MyClass {
  myMethod(@logParameter param1: string, @logParameter param2: number) {
    console.log('Executing myMethod with parameters:', param1, param2);
  }
}
In this example, the `logParameter` function acts as a parameter decorator. It is applied to the parameters of the `myMethod` method using the `@` syntax. When `myMethod` is called, the parameter decorator is invoked for each parameter declaration, and the target, propertyKey, and parameterIndex parameters receive information about the parameter being decorated.
These are the various types of decorators available in TypeScript, each serving a different purpose and allowing for flexible and powerful meta-programming capabilities.
» Data Bindings in Angular
There are two types of data binding angular supports. 1) One Way Data Binding & 2) Two Way Data Binding
One Way Data Binding:
From Component to Template (i.e. Source to View)
{{expression}} // interpolation

[target]="expression" // property binding

bind-target="expression" // attribute
From Template to Component (i.e. View to Source) via event binding
(target)="statement"

on-target="statement"
Two Way Data Binding:
From Component to Template and Template to Component (both way)
[(target)]="expression"

bindon-target="expression"
» Filters in Angular: Explanation and Examples
1. Basic Usage: Filters in Angular are used to format and manipulate data displayed in templates. They allow you to transform data before it is rendered to the user. Here's a basic example:
<!-- Template -->
<p>{{ dateValue | date }}</p>

<!-- Controller -->
$scope.dateValue = new Date();
This example uses the built-in Angular filter date to format the dateValue as a human-readable date string.
2. Custom Filters: You can also create custom filters to perform specific transformations on data. For example, let's create a filter to capitalize the first letter of a string:
// Custom Filter
app.filter('capitalize', function() {
  return function(input) {
    if (!input) return '';
    return input.charAt(0).toUpperCase() + input.slice(1);
  };
});

<!-- Template -->
<p>{{ textValue | capitalize }}</p>

<!-- Controller -->
$scope.textValue = 'hello world';
This custom capitalize filter takes a string input and returns the same string with the first letter capitalized.
3. Chaining Filters: Filters can be chained together to perform multiple transformations on data. For example, let's first capitalize a string and then convert it to uppercase:
<!-- Template -->
<p>{{ textValue | capitalize | uppercase }}</p>

<!-- Controller -->
$scope.textValue = 'hello world';
This example first capitalizes the textValue string using the capitalize filter and then converts it to uppercase using the uppercase filter.
4. Filtering Arrays: Filters can also be applied to arrays to filter or sort data based on specific criteria. For example, let's filter an array of objects based on a property value:
<!-- Template -->
<ul>
  <li ng-repeat="item in items | filter: { category: 'fruit' }">{{ item.name }}</li>
</ul>

<!-- Controller -->
$scope.items = [
  { name: 'Apple', category: 'fruit' },
  { name: 'Carrot', category: 'vegetable' },
  { name: 'Banana', category: 'fruit' }
];
In this example, the ng-repeat directive is used to iterate over the items array and display only those items whose category property is 'fruit'.
Overall, filters in Angular provide a powerful way to format, transform, and manipulate data in templates, making it easier to present data to users in a desired format.
» What are Pipes in Angular? Explain Pure and Impure Pipes? How would you create custom pipe?
Pipes are used to transform data, when we only need that data transformed in template. It is similar to what filters in AngularJS.
We use a pipe with the | syntax in the template, the | character is called the pipe character.
import { Component } from '@angular/core';

@Component({
  selector: 'my-app',
  template: `<div>currency is {{ currency:'USD' }}</div>`
})
export class AppComponent {
currency = 5500.20;
}

// output:

// currency is  USD 5,500.20
We can even chain pipe together, ex:
{{ 5500.20 | currency: 'USD' | lowercase }}

// output
usd 5,500.20.
Built-in Pipes: There are various built-in pipes available in Angular. Ex. Date, Currency, Decimal, JSON, UpperCase, LowerCase etc.. Full list is here: https://angular.io/api?type=pipe
Custom Pipe: We can create custom pipe using @Pipe decorator and annotate a class like:
import { Pipe } from '@ angular/ core';
.
.
@Pipe({ name:"test" }) class TestPipe { }

// The name parameter for the Pipe decorator is how the pipe will be called in templates.
Transform function: The actual logic for pipe is put in a function called transform on the class. Example:
import { Pipe, PipeTransform } from '@angular/core';


/*
 * It returns the split string based on the seperator and index
 * @Parameters:
 * @input: input string from pipe
 * @seperator: separator to split string (string)
 * @index: to return the index value from an array (number)
 *
 * @Usage:
 *   value | splitStr:"seperator":index
 *
 * @Example: So if we have a string i.e. Hi_Hello_World and if we want to get only World here then we'll
 *   {{ Hi_Hello_World | splitStr:"_":[2] }}
 *
 * @Output: World
*/

@Pipe({
  name: 'splitStr'
})
export class SplitPipe implements PipeTransform {
  transform(input: any, seperator: string, index: number): string {
    return input.split(seperator)[index];
  }
}
The first argument to the transform function is the value that is passed into the pipe, i.e. the thing that goes before the | in the expression.
The second parameter to the transform function is the first param we pass into our pipe, i.e. the thing that goes after the : in the expression.
Pure Pipe: A pure pipe is only called when Angular detects a change in the value or the parameters passed to a pipe. For example, any changes to a primitive input value (String, Number, Boolean, Symbol) or a changed object reference (Date, Array, Function, Object).
Impure Pipe: An impure pipe is called for every change detection cycle no matter whether the value or parameters changes. i.e, An impure pipe is called often, as often as every keystroke or mouse-move
» What is the difference between pipe and filter in Angular?
Pipe: In Angular, a "pipe" is a feature that allows you to transform data in a template before displaying it to the user. Pipes are used within template expressions (in curly braces {{ }}) to apply transformations to values. Angular provides several built-in pipes for common tasks like formatting dates, numbers, and currency, as well as for filtering and sorting arrays. You can also create custom pipes to perform specific transformations on data.
Filter: "Filter" is a term that is often used to refer to a specific type of pipe used for filtering arrays of data. In Angular, the filter pipe allows you to filter an array based on specific criteria and display only the items that meet the criteria. The filter pipe is commonly used with the *ngFor directive in Angular templates to display a subset of items from an array. While "filter" can refer specifically to the filter pipe, it can also be used more broadly to describe any type of data transformation or manipulation.
In summary, while "pipe" is a more general term in Angular that refers to a feature for transforming data in templates, "filter" typically refers to a specific type of pipe used for filtering arrays of data. However, the two terms are related, as the filter pipe is a specific type of pipe used for data transformation.
» What is async pipe? What is the purpose of async pipe? Explain with simple example
The async pipe is a built-in Angular pipe that is used to automatically subscribe to an Observable or Promise and unwrap the data it emits. It simplifies the process of working with asynchronous data streams in Angular templates by handling subscriptions and unsubscriptions automatically.
The purpose of the async pipe is to avoid managing subscriptions manually in component classes and templates, reducing the risk of memory leaks and improving code readability.
Here's a simple example to demonstrate the usage of the async pipe:
Suppose you have a component that retrieves user data asynchronously from a service and exposes it as an Observable:
import { Component } from '@angular/core';
import { Observable } from 'rxjs';
import { UserService } from './user.service';

@Component({
  selector: 'app-user',
  template: `
    <div *ngIf="user$ | async as user">
      <h2>Welcome, {{ user.name }}</h2>
      <p>Email: {{ user.email }}</p>
    </div>
  `
})
export class UserComponent {
  user$: Observable<any>;

  constructor(private userService: UserService) {
    this.user$ = this.userService.getUser();
  }
}
In this example:
- - The `user$` property is an Observable that emits user data.
- - The `UserService` is responsible for fetching user data asynchronously.
- - The async pipe (`*ngIf="user$ | async as user"`) subscribes to the `user$` Observable and unwraps the emitted user data into the `user` variable.
- - Inside the `div`, we can access properties of the `user` object directly in the template.
By using the async pipe, we eliminate the need to manually subscribe to the Observable in the component class and handle the subscription lifecycle. The async pipe takes care of subscribing to and unsubscribing from the Observable automatically, ensuring clean-up and preventing memory leaks.
» What is Polyfills.ts in Angular?
polyfills.ts is a file in an Angular project that contains polyfills, which are code snippets that provide modern JavaScript features to older browsers that do not support them natively. Polyfills bridge the gap between the features supported by modern browsers and those supported by older browsers, ensuring that an Angular application can run consistently across different browsers and environments.
The polyfills.ts file typically includes polyfills for various features such as:
ES6/ES7 features: Polyfills for features introduced in ECMAScript 2015 (ES6) and later versions, such as Promise, Array.prototype.includes, Array.from, Object.assign, etc.
Web standards: Polyfills for web standards and APIs that are not fully supported in all browsers, such as fetch for making network requests, IntersectionObserver for observing changes to the intersection of elements with the viewport, Intl for internationalization and localization, etc.
Browser APIs: Polyfills for browser-specific APIs or features, such as EventTarget, Element.prototype.classList, Element.prototype.closest, etc.
By including these polyfills in the polyfills.ts file, an Angular application can ensure consistent behavior and functionality across different browsers, enabling developers to write modern JavaScript code without worrying about compatibility issues with older browsers.
Here's an example of what a typical polyfills.ts file might look like:
// Polyfills for core-js features
import 'core-js/es6/array';
import 'core-js/es6/object';
import 'core-js/es7/reflect';
import 'core-js/es6/promise';

// Polyfills for web APIs
import 'zone.js/dist/zone';  // Included for Angular's zone.js

// Other polyfills as needed
These polyfills are typically installed and managed via dependencies such as core-js, zone.js, and other polyfill libraries. They are loaded and executed at the beginning of the application to ensure that the necessary features are available before any other code is executed.
» What is NgZone?
NgZone is a core Angular service that provides a way to execute code outside of Angular's change detection zone or to explicitly run code within Angular's zone. Angular's change detection mechanism runs inside a zone, which is a context where Angular tracks and manages asynchronous operations such as event handling, HTTP requests, timers, and so on.
The primary purpose of NgZone is to facilitate better integration with non-Angular code and to manage asynchronous tasks that occur outside of Angular's zone. It allows you to explicitly control when Angular's change detection runs and when it does not, which can be useful for optimizing performance and avoiding unnecessary change detection cycles.
Some key features and uses of NgZone include:
- Running code outside Angular's zone: You can use NgZone.runOutsideAngular() method to execute code that doesn't need to trigger change detection. This can be useful for performance-critical tasks or for integrating with third-party libraries that are not zone-aware.
- Triggering change detection manually: You can use NgZone.run() method to explicitly trigger change detection after performing certain asynchronous operations. This ensures that any changes made within the operation are reflected in the UI.
- Monitoring zone activity: You can subscribe to onStable and onUnstable events to be notified when Angular's zone becomes stable or unstable, respectively. This can be useful for debugging or monitoring application performance.
Here's a simple example demonstrating the use of NgZone:
import { Component, NgZone } from '@angular/core';

@Component({
  selector: 'app-root',
  template: `
    <button (click)="runOutsideZone()">Run Outside Zone</button>
  `
})
export class AppComponent {
  constructor(private ngZone: NgZone) {}

  runOutsideZone() {
    this.ngZone.runOutsideAngular(() => {
      // Execute code outside Angular's zone
      setTimeout(() => {
        console.log('Timeout executed outside zone');
        // Manually trigger change detection
        this.ngZone.run(() => {
          console.log('Change detection triggered');
        });
      }, 1000);
    });
  }
}
In this example, clicking the button triggers the runOutsideZone() method, which executes a setTimeout callback outside Angular's zone using NgZone.runOutsideAngular(). Inside the callback, another NgZone.run() call is used to manually trigger change detection and update the UI. This demonstrates how NgZone can be used to manage asynchronous tasks and control change detection in an Angular application.
» What is EventEmitter?
In Parent-Child component, if we want to send some data from child component to parent component we use the @output decorator with EventEmitter to create a custom event. EventEmitters are RxJS Subjects behind the scenes.
» Dependancies vs DevDependencies
The difference between these two, is that devDependencies are modules which are only required during development, while dependencies are modules which are also required at runtime.
To save a dependency as a devDependency on installation we need to do an npm install --save-dev, instead of just an npm install --save. A nice shorthand for installing a devDependency that I like to use is npm i -D. The shorthand for saving a regular dependency is -S instead of -D
» Explain Token Based Authentication
The Token-based authentication has received expansion over last few years due to RESTful Web APIs, SPA and so on. The Token based authentication is stateless.
Stateless means every transaction is performed as if it was being done for the very first time and there is no previously stored information used for the current transaction.
Token Based Authentication steps - A user enters their login credentials and the server verifies the entered credentials. Validating to the entered credentials, It’s correct or not. If the credentials are correct, returns a signed token. This token is stored in local storage on the client side. We can also store in session storage or cookie.
» Error logging and caching in Angular
The default implementation of ErrorHandler log error messages, status, and stack to the console. To intercept error handling, we write a custom exception handler that replaces this default as appropriate for your app.
import { Injectable, ErrorHandler } from '@angular/core';
import {ErrorLoggService} from './error-logg.service';

// Global error handler for logging errors
@Injectable()
export class GlobalErrorHandler extends ErrorHandler {
    constructor(private errorLogService: ErrorLoggService) {
       //Angular provides a hook for centralized exception handling.
       //constructor ErrorHandler(): ErrorHandler
        super();
    }

    handleError(error) : void {
        this.errorLogService.logError(error);
    }
}
» ForRoot vs ForChild
- ForRoot: Use in root modules like app.modules. It creates a module that contains all the other directives, given routes and other router service itself.
- ForChild: Use in child modules. It creates a module that contains all the other directives, given routes but does not include router service.
» What is resolver in Angular
A resolver is a service that pre-fetches data required for a route before the route is activated and the component is rendered.
Resolvers are typically used to ensure that the data required by a component is available before the component is displayed to the user.
Resolvers are implemented as Angular route guards and are specified in the route configuration.
Resolvers are ideal for fetching data from APIs or performing other asynchronous tasks before routing to a specific component.
import { Injectable } from '@angular/core';
import { Resolve } from '@angular/router';
import { Observable } from 'rxjs';
import { DataService } from './data.service';

@Injectable({
  providedIn: 'root'
})
export class DataResolver implements Resolve<any> {
  constructor(private dataService: DataService) {}

  resolve(): Observable<any> {
    return this.dataService.getData();
  }
}
Usage in route configuration:
const routes: Routes = [
  {
    path: 'example',
    component: ExampleComponent,
    resolve: { data: DataResolver }
  }
];
» What is ng-template
ng-template is an Angular element which we used with structural directives like *ngIf, *ngFor, *ngSwitch to display content based on the condition. You can say ng-template is kind of virtual element which only displays when some condition is true.
Here's the in depth article about ng-template
<div *ngIf="isVisible; then showTemplate1 else showTemplate2"></div>

<ng-template #showTemplate1>Template 1</ng-template>
<ng-template #showTemplate2>Template 2</ng-template>
» What is TemplateRef and ViewContainerRef
- TemplateRef is a class.
- Any structural directive access the content of
element through TemplateRef class. - ViewContainerRef as the name says, is the container of a view.
- As per angular.io it represents a container where one or more views can be attached to a component.
TemplateRef and ViewContainerRef are two important concepts in Angular that are used to work with dynamic templates and dynamically render components.
TemplateRef:
TemplateRef represents an Angular template that can be instantiated to create views.
It provides a reference to the template's content, which can include HTML and Angular directives.
TemplateRef is typically used in conjunction with structural directives like *ngFor and *ngIf to dynamically render content based on data or conditions.
Example:
import { Component, ViewChild, TemplateRef } from '@angular/core';

@Component({
  selector: 'app-example',
  template: `
    <ng-container *ngTemplateOutlet="myTemplate"></ng-container>
  `
})
export class ExampleComponent {
  @ViewChild('myTemplate') myTemplate: TemplateRef<any>;
  name = 'John';
}
<ng-template #myTemplate>
  <p>Hello, {{ name }}</p>
</ng-template>
ViewContainerRef:
ViewContainerRef represents a container where one or more views can be attached or removed dynamically.
It provides methods for creating, inserting, and removing views within the container.
ViewContainerRef is used in conjunction with TemplateRef to create dynamic components or render dynamic content.
Example:
import { Component, ViewChild, TemplateRef, ViewContainerRef } from '@angular/core';

@Component({
  selector: 'app-example',
  template: `
    <ng-template #myTemplate>
      <p>Hello, {{ name }}</p>
    </ng-template>
    <ng-container #container></ng-container>
  `
})
export class ExampleComponent {
  @ViewChild('myTemplate') myTemplate: TemplateRef<any>;
  @ViewChild('container', { read: ViewContainerRef }) container: ViewContainerRef;
  name = 'John';

  constructor() {}

  ngOnInit() {
    // Create and attach the view to the container
    const view = this.container.createEmbeddedView(this.myTemplate, { $implicit: this.name });
  }
}
In the above examples, TemplateRef represents a template with dynamic content, while ViewContainerRef is used to create a container where the template can be dynamically rendered. The createEmbeddedView() method of ViewContainerRef is used to instantiate the template and attach it to the container. This allows for the dynamic creation and rendering of content within an Angular application.
» Structural Directives Vs Attribute Directives
- Structural Directives are responsible for HTML layout. They shape or reshape the DOM structure by adding, removing or manipulating element.
- Ex. *ngIf, *ngFor, *ngSwitch
- The asterisk (*) states it is a structural directives.
- Attribute Directives just changes the behaviour and appearance of element.
- Ex. ngClass, ngStyle
» Custom Directives
Creating a custom directive is same like creating a component. You just need to use @directive instead of @component decorator.
» Angular's Dependency Injection
Dependency injection is a design pattern that allows components and services to be easily shared and reused across an application. In Angular, dependency injection is a core feature that helps manage dependencies between different parts of the application.
At a high level, dependency injection works by allowing a component or service to declare its dependencies in its constructor. When the component or service is created, Angular automatically resolves these dependencies and provides them to the component or service. This makes it easy to swap out components and services without having to modify the code that uses them.
Here's an example of how dependency injection works in Angular:
Suppose you have an Angular application that displays a list of customers. The application has a customer service that provides data about the customers, and a customer component that displays the list of customers.
The customer component needs to get data from the customer service to display the list of customers. Instead of creating an instance of the customer service inside the component, you can use dependency injection to inject the customer service into the component.
Here's how you might declare the customer service as a dependency in the customer component's constructor:
import { Component } from '@angular/core';
import { CustomerService } from './customer.service';

@Component({
  selector: 'app-customer',
  templateUrl: './customer.component.html'
})
export class CustomerComponent {
  constructor(private customerService: CustomerService) {}
}
In this example, the customer component declares a dependency on the CustomerService by including it as a parameter in the constructor. The private keyword tells Angular to create a private instance of the customer service and inject it into the component.
Now, when the customer component is created, Angular automatically resolves the CustomerService dependency and provides an instance of the service to the component. This allows the component to use the customer service to get data about the customers, without having to create an instance of the service itself.
Overall, dependency injection is a powerful and flexible way to manage dependencies between different parts of an Angular application. It allows components and services to be easily shared and reused, making it easier to build and maintain large, complex applications.
» Hierachical Injector
Angular Dependency Injector is actually a hierachical injector means that if we provide a service in some place of our application ex. UserComponentthe Angular knows how to create instance of service for UserComponent and for all its child components. So which means UserComponent and its child components and the child component of child component will receive the same instance of the service.
We can also provide service to other places. Ex:
- AppModule: If we provide service in
AppModulethen same instance of the class of the service is available in entire application i.e. in all components, all directives and in all other services where we inject service. - AppComponent: Same instance of service is available for all Components including its children but not for other services.
- Any other component: Same instance of the Service is available for the Component and all its child components.
Note: Instances don't propogate up they only go down of the components tree. Ex. Lets say we have one, two and three components and we inject service to component two then only component three can receive the instance and not the component one.
» What is TypeScript?
- TypeScript is a superset of JavaScript.
- Unlike JavaScript (which is dynamically typed language) TypeScript is a static typed language.
- What TypeScript does is just adds some extra feature on top of JavaScript.
- Compiler of TypeScript written in TypeScript itself and it compiles TypeScript code into JavaScript so that browser can understand.
» Data Types in TypeScript
Following are some main data types in typescript:
// String
let myString: string = "Programming World";
// with string interpolation
let myText: string = `Welcome to my blog`;

---------------------------

// Number
let myNumber: number = 100;

---------------------------

// Boolean
let myBoolean: boolean = true;

---------------------------

// Array
let sport: string[] = ['cricket', 'football', 'tennis'];
let sport1: Array<string> = ['badminton', 'hockey', 'rugby'];
let numArr: number[] = [100, 200, 300];
let numArr1: Array<number> = [100, 200, 300];

---------------------------

// Object
let person: object = { name: 'John', age: 40 };

---------------------------

// Tuple
// It allows us to express an array with known but not same types.

// declaration
let myTupleArr: [string, number];

// correct initialisation
myTupleArr  = ["ProgrammingWorld", 100];

// incorrect initialisation
myTupleArr  = [100, "ProgrammingWorld"];

// Accessing
console.log(myTupleArr[0]);
console.log(myTupleArr[1]);

// while accessing you have to sure following:

console.log( myTupleArr[0].substring(1));
// correct

console.log( myTupleArr[1].substring(1));
// error, 'number' does not have 'substring'

---------------------------

// null
let noVal: null = null;

---------------------------

// undefined
let nothing: undefined = undefined;
» Dynamically Typed Language vs Static Typed Language
- In Static Typed Language you have to define type of variable by declaring it explicitly before using them. While in Dynamic Typed Language dosen’t have this contraint.
- In Static Typed Language type checking is done during compile time while in Dynamic Typed Language it is done during runtime.
- Static Typed Language makes your development slower as you need to take care of types of variable and other related things. While in Dynamic Typed Language you don’t required all of these hence development is bit faster as compared to Static Typed Language.
- Install TypeScript:
npm install -g typescript// g for global- type command
tscto check version of TypeScript
» What is ViewEncapsulation in Angular
Before understading the ViewEncapsulation in Angular we need to first know about Shadow DOM.
Angular is based on the Web Components and Shadow DOM is one the core feature of it which enables DOM tree and style encapsulation.
Shadow DOM lets us include styles in Web Components without letting them leak outside the component's scope. Angular also provide this feature for Components and we can manage it through encapsulation property.
There are 3 ViewEncapsulation types in Angular.
- ViewEncapsulation.Emulated : The default behaviour of Angular's encapsulation. In this mode Angular changes generic CSS class selector to one that targets just a single component type by generating some auto attributes. So any style we define in one component don't leak out to the rest of the application and but our component still can inherit global styles.
- ViewEncapsulation.Native/ShadowDom: In this case if we applied styles to our component then don't leak outside of that component's scope but our component cannot inherit global styles and we need to define all the required global styles on our component's decorator. ViewEncapsulation.Native requires a feature called the shadow DOM which is not supported by all browsers.
- ViewEncapsulation.None: Styles defined in a component will get applied to all the components of the application, in this case angular will not attach 'component-specific-attributes' to the elements of component.
More detailed tutorials on this:
Shadow DOM strategies-in-angular
Scoping Your Styles in Angular With ViewEncapsulation
» What is @ViewChild
Using @ViewChild decorator you can directly select an element from component's template.
Example:
// app component

import { Component, ViewChild } from "@angular/core";

@Component({
  selector: "my-app",
  templateUrl: "./app.component.html",
  styleUrls: ["./app.component.css"]
})
export class AppComponent {
  name = "Angular";

  @ViewChild("myname", { static: false }) myName;

  handler() {
    console.log(this.myName);
  }
}


// app component template (app.component.html)

<input #myname (keypress)="handler()">
Here, we have an input type text with reference variable #myName. We are calling a method on keypress for input element and in the componen'ts handler method getting the reference of it using @ViewChild decorator which is declared as @ViewChild("myname", { static: false }) myName;
Demo: https://stackblitz.com/edit/angular-6gwwea?file=src%2Fapp%2Fapp.component.ts
» What is @NgModule?
An NgModule is a class marked by the @NgModule decorator. @NgModule takes a metadata object that describes components, pipes, directives, services etc. In simple words @NgModule is to declare each thing you create in Angular and group them together.
Following are the main parts of NgModule's metadata object:
- declarations: It is used to declare components, directives, pipes that belongs to the current module. Once declared here you can use them throughout the whole module. Everything inside declarations knows each other.
- exports: If you want to expose your module's component, directive or pipes to other modules available in the application then you can declare it in exports property.
- imports: It is used to import supporting modules likes FormsModule, RouterModule, CommonModule, or any other custom-made feature module.
- providers: It is used to inject the services required by the components, directives, pipes in our module.
- bootstrap: To bootstrap/launch the component, the AppComponent is by default.
» What is module loading in Angular? Explain Eager, Lazy and Preloading?
- Eager loading means the loading before the applications starts.
- Lazy loading means on demand modules loading.
- Preloading means to load modules in the backend just after application starts.
Read more from here: Angular module loading
» Explain Interceptors in Angular?
In Angular, Interceptors are used to intercept (like middleware) requests and responses. Interceptors are very useful for the purpose of logging and caching.
Read more : Angular httpclient-interceptors
» What is router-outlet?
`router-outlet` is a directive provided by Angular's router module that serves as a placeholder where the router dynamically renders the components associated with the activated routes. It acts as the container where the routed components are displayed based on the current URL.
Here's a simple example to explain `router-outlet`:
Suppose you have defined the following routes in your Angular application:
const routes: Routes = [
  { path: 'home', component: HomeComponent },
  { path: 'about', component: AboutComponent },
  { path: 'contact', component: ContactComponent }
];
Now, let's say you have the following HTML template for your main application component (`app.component.html`):
<!-- app.component.html -->
<nav>
  <a routerLink="/home">Home</a>
  <a routerLink="/about">About</a>
  <a routerLink="/contact">Contact</a>
</nav>

<router-outlet></router-outlet>
In this example:
- The `
- When the user navigates to the `/home` route, Angular will render the `HomeComponent` inside the `router-outlet`.
- Similarly, when navigating to `/about`, Angular will render the `AboutComponent`, and so on.
Yes, you can declare multiple `router-outlet` directives in your application, but typically you would only have one main `router-outlet` in your application layout to handle the primary content area. However, in certain scenarios, you may have multiple named `router-outlet` instances for more complex routing setups, such as nested layouts or secondary content areas.
To use multiple `router-outlet` instances, you would assign unique names to each outlet and specify the outlet name in the route configuration. For example:
<router-outlet name="primary"></router-outlet>
<router-outlet name="secondary"></router-outlet>
And in your route configuration:
const routes: Routes = [
  { path: 'home', component: HomeComponent, outlet: 'primary' },
  { path: 'about', component: AboutComponent, outlet: 'primary' },
  { path: 'sidebar', component: SidebarComponent, outlet: 'secondary' }
];
This allows you to render components into different named outlets based on the route configuration. However, using multiple named outlets adds complexity and should be used judiciously based on the requirements of your application.
» How to define routes in Angular?
First you need to import Routes and RouterModule from '@angular/router'
Then you need to configure routes in the Routes array of object.
Example:
import { Routes, RouterModule } from '@angular/router';

const appRoutes: Routes = [
 { path: 'student/:id',  component: StudentComponent },
 {
   path: 'dashboards',
   component: DashboardsComponent,
   data: { title: 'test' }
 },
 { path: '',
   redirectTo: '/dashboards',
   pathMatch: 'full'
 },
 { path: '**', component: PageNotFoundComponent }
];

@NgModule({
 imports: [
   RouterModule.forRoot(
     appRoutes
   )
   // other imports here
 ],
 ...
})
export class AppModule { }
» What is Lazy Loading in Angular?
Lazy loading is one of the most useful concepts of Angular Routing. It helps us to download the web pages in chunks instead of downloading everything in a big bundle. It is used for lazy loading by asynchronously loading the feature module for routing whenever required using the property loadChildren.
const routes: Routes = [
  // lazy loading module. * A `LoadChildren` object specifying lazy-loaded child routes.
  { path: 'courses', loadChildren: './courses/module/courses.module#CoursesModule' },
  { path: 'students', loadChildren: './students/module/students.module#StudentsModule' },
  { path: 'report', loadChildren: './report/module/report.module#ReportModule' },
];

// Here, we have created 3 separate modules for courses, students and report and
// those we are lazily loading using the loadChildren property.
// before # we have declared path of module and after # we have declared name of the module
Here, we have created 3 separate modules for courses, students and report and those we are lazily loading using the loadChildren property. Before # we have declared path of module and after # we have declared name of the module
» Explain the concept of lazy loading in frontend development and its importance in optimizing performance.
Concept of Lazy Loading in Frontend Development:
Lazy loading is a technique used in frontend development to defer the loading of non-critical resources until they are needed. Instead of loading all assets (such as images, scripts, or components) when a web page is initially loaded, lazy loading delays the loading of these resources until they are required for user interaction or viewing.
Lazy loading is typically implemented in scenarios where there are large amounts of content or resources on a web page, and loading everything at once would result in slower page load times and decreased performance. By loading resources asynchronously or on-demand, lazy loading helps optimize performance and improve user experience.
Importance of Lazy Loading in Optimizing Performance:
Lazy loading plays a crucial role in optimizing performance in frontend development for several reasons:
- Faster Initial Page Load: Lazy loading reduces the initial payload size of a web page by deferring the loading of non-essential resources. This results in faster initial page load times, improving the perceived performance of the application.
- Improved Page Responsiveness: By loading resources asynchronously or on-demand, lazy loading allows the main content of the web page to render quickly, improving overall page responsiveness and user experience.
- Reduced Bandwidth Usage: Lazy loading conserves bandwidth by loading only the resources that are needed, reducing unnecessary data transfer and optimizing network performance, especially for users on slow or limited internet connections.
- Optimized Resource Utilization: Lazy loading enables more efficient resource utilization by loading resources only when they are required, minimizing memory usage and reducing the strain on the browser and client device.
- Scalability and Maintainability: Lazy loading facilitates the scalability and maintainability of frontend applications by allowing developers to modularize and manage resources more effectively. It enables the addition of new features or content without compromising performance.
» How would you ensure data consistency and synchronization in a complex frontend application with multiple components and data sources?
Ensuring Data Consistency and Synchronization in Frontend Applications:
In a complex frontend application with multiple components and data sources, it's essential to maintain data consistency and synchronization to ensure that all parts of the application have access to the most up-to-date and accurate data.
1. Centralized State Management:
One approach to ensuring data consistency is to implement centralized state management. This involves maintaining application state in a single, centralized location that can be accessed and updated by all components as needed.
Example:
Suppose you're building a shopping cart feature for an e-commerce website. Instead of storing cart data locally within each component, you can use a centralized state management library like Redux or Vuex to store the cart state globally. This allows all components, such as product listings, cart summary, and checkout, to access and update the cart state as necessary, ensuring consistency across the application.
2. Real-Time Data Updates:
In applications where data changes frequently or in real-time, it's important to implement mechanisms for real-time data updates to keep all components synchronized with the latest data changes.
Example:
Consider a messaging application where users can send and receive messages in real-time. To ensure data consistency across multiple chat windows, you can use WebSocket or Server-Sent Events (SSE) to establish a real-time connection with the server. Whenever a new message is sent or received, the server broadcasts the message to all connected clients, updating the message list in real-time for all users.
3. Optimistic Updates and Offline Support:
To provide a seamless user experience and handle scenarios where users may be offline or experience network latency, you can implement optimistic updates and offline support. Optimistic updates involve immediately updating the UI with user actions, such as adding an item to a cart, and then asynchronously syncing the changes with the server.
Example:
In a task management application, when a user marks a task as completed, you can immediately update the UI to reflect the change, even before confirming the update with the server. If the server confirms the update successfully, the UI remains unchanged. If there's an error or the user is offline, you can provide feedback and handle the sync process gracefully once the connection is restored.
By implementing these strategies, you can ensure data consistency and synchronization in complex frontend applications, enabling a seamless and reliable user experience across different components and data sources.
» CanActivate route guard in Angular
CanActivate is a guard which we use to check scenarios like, whether user is authenticated or user has permission of something or not. In short it is useful to check something before a components gets used.
Example:
auth-guard.service.ts
import { CanActivate, ActivatedRouteSnapshot, RouterStateSnapshot, Router } from '@angular/router';
import { Injectable } from '@angular/core';
import { AuthService } from './auth.service';

@Injectable()
export class AuthGuard implements CanActivate {
    constructor(private authService: AuthService, private router: Router) { }

    canActivate(route: ActivatedRouteSnapshot, state: RouterStateSnapshot): any {

        // If user is not authenticated then redirect to signin page.
        if (!this.authService.isAuthenticated()) {
            this.router.navigateByUrl('/signin');
            this.authService.deleteToken();
            return false;
        }
        return true;
    }
}
Here, we have created a service i.e. auth-guard.service.ts and from there we are checking whether user is authenticated or not inside CanActivate method. If not then redirecting user to signin page.
CanActivate method contains two class parameters 1) ActivatedRouteSnapshot 2) RouterStateSnapshot
- ActivatedRouteSnapshot: Contains the information about a route associated with a component loaded in an outlet at a particular moment in time. ActivatedRouteSnapshot can also be used to traverse the router state tree.
- RouterStateSnapshot: Represents the state of the router at a moment in time. This is a tree of activated route snapshots. Every node in this tree knows about the "consumed" URL segments, the extracted parameters, and the resolved data.
app-routing.module.ts
import { NgModule } from '@angular/core';
import { Routes, RouterModule } from '@angular/router';
import { DashboardComponent } from './dashboard/dashboard.component';
import { SignupComponent } from './auth/signup/signup.component';
import { SigninComponent } from './auth/signin/signin.component';
import { AuthGuard } from './auth/auth-guard-service';

/**
 * @Routes Object that we use in our application component that describes the
 * routes we want to use.
 * @path to specify the URL
 * @component specify the component we want to route to
 * @redirectTo we can redirect using this option
 */
const routes: Routes = [
  { path: '', component: DashboardComponent, canActivate: [AuthGuard] },
  { path: 'signup', component: SignupComponent },
  { path: 'signin', component: SigninComponent },
];

@NgModule({
  imports: [RouterModule.forRoot(routes)],
  exports: [RouterModule]
})
export class AppRoutingModule { }
In app-routing.module.ts we have used AuthGuard as a value for the canActivate property in Routes object for DashboardComponent. So that DashboardComponent only accessible when user is authenticated.
» What Are @HostBinding() and @HostListener() in Angular?
`@HostBinding()` and `@HostListener()` are decorators provided by Angular for interacting with the host element of a directive or component.
**@HostBinding():**
- It allows you to set properties of the host element dynamically from within the directive or component class.
- The property specified with `@HostBinding()` will be bound to the specified value or expression.
**Example:**
Suppose you have a directive that enhances the styling of a button when hovered over.
import { Directive, HostBinding, HostListener } from '@angular/core';

@Directive({
  selector: '[appHoverEffect]'
})
export class HoverEffectDirective {

  @HostBinding('class.hovered') isHovered = false;

  @HostListener('mouseenter') onMouseEnter() {
    this.isHovered = true;
  }

  @HostListener('mouseleave') onMouseLeave() {
    this.isHovered = false;
  }
}
In this example:
- We use `@HostBinding('class.hovered')` to bind the `hovered` class to the host element's `class` attribute based on the value of the `isHovered` property.
- We use `@HostListener('mouseenter')` and `@HostListener('mouseleave')` to listen for mouse enter and mouse leave events on the host element, respectively, and toggle the `isHovered` property accordingly.
** use case:**
A example of `@HostBinding()` could be a directive that adds accessibility attributes to form controls. For instance, you might create a directive that dynamically sets the `aria-invalid` attribute on an input element based on its validity state. This improves the accessibility of the form by providing screen readers with information about the validity of the input field.
**@HostListener():**
- It allows you to listen for events on the host element of a directive or component.
- You can specify the event name as a parameter to `@HostListener()`.
**Example:**
Continuing with the previous example, we can use `@HostListener()` to listen for click events on the host element.
import { Directive, HostBinding, HostListener } from '@angular/core';

@Directive({
  selector: '[appHoverEffect]'
})
export class HoverEffectDirective {

  @HostBinding('class.hovered') isHovered = false;

  @HostListener('mouseenter') onMouseEnter() {
    this.isHovered = true;
  }

  @HostListener('mouseleave') onMouseLeave() {
    this.isHovered = false;
  }

  @HostListener('click') onClick() {
    console.log('Host element clicked');
  }
}
In this example, we added a new `@HostListener('click')` decorator that listens for click events on the host element and logs a message when the click event occurs.
A example of `@HostListener()` could be a directive that enhances the functionality of a custom dropdown component. You might create a directive that listens for keyboard events on the host element to allow users to navigate and select options in the dropdown using keyboard shortcuts, providing a better user experience.
» What are Streams?
- Streams are sequence of values over time. Example:
- Streams can be a number goes up by 1 every second might have a stream like this: [0,1,2,3,4,5,6,7]
- Streams can be sequence of x and y positions of mouse click events like : [(12,32), (244,44), (332,12)]
- Streams can be a event of keypress
- Streams can be a JSON representation coming from API or use entered data ex:
[
 {"name":"H"}
 {"name":"HE"}
 {"name":"HEL"}
 {"name":"HELL"}
 {"name":"HELLO"}
]
» What are Reactive Programming and RxJS?
Reactive programming is the idea that you can create your entire program just by defining the different streams and the operations that are performed on those streams.
RxJS stands for Reactive Extensions for JavaScript, and its a library that gives us an implementation of Observables for JavaScript.
» What is Observable, Observer and Subscribe in Angular
Lets understand this through an example:
service.ts
 getCourses(): Observable<Course[]> {
    // map works exactly the same for Observables as it does for arrays.
    // You use map to transform a collection of items into a collection of different items
    return this.httpClient.get(this.courseUrl).map(res => {
      //Maps the response object sent from the server
      return res["data"].docs as Course[];
    })
  }
Observable is a stream of events or data. In above example we've written a getCourses method which returns an Observable.
component.ts
 show() {
    this.courseService.getCourses().subscribe(course => {
      console.log(course);
    });
  }
In the component we've subscribed the observable which we are getting from getCourses method. Subscribe() just starts the subscription of streams for you. You won't get any data until you subscribe to it.
component.ts
show() {
    this.courseService.getCourses().subscribe(
    (course) => {
      console.log(course);
    },
    (error) => {
      console.log(error);
    }
)
The subscribe method takes in an observer. An observer has three methods:
- The method to process each time an item is emitted from the observable.
- The method to process any error that occurs.
- The method to clean up anything when the observer completes. This last one is seldom used when working with Angular's observables.
Reference from : https://stackoverflow.com/questions/51520584/what-is-observable-observer-and-subscribe-in-angular
More about observable: https://blogs.msmvps.com/deborahk/
» What is State? Explain Redux and its 3 principles?
State is a representation of application like username, password, email, input, user selection, data from API, view/UI state, location state or router state etc.
Redux: Redux is library to manage large state. It is very useful for sharing data between components. Redux has predictable state management using 3 principles. Following are the 3 principles:
- Single Source of Truth(state): Everything that changes in your application, including the data and UI state, is contained in a single object, we call the state or state tree.
- State is Read-Only (immutable): The only way to change the state tree is by dispatching Action. An Action is a plain object, describing in the minimal way what changed in the application.
- Changes using pure functions: All the changes in state tree are made by pure function called Reducers.
Redux Flow: (click on image to zoom)

» What is NgRx?
NgRx is a state management for Angular applications, inspired by Redux. The pattern is same as Redux and it adds the NgRx library on top of it.
NgRx is a collection of libraries to implement the Redux pattern in Angular application.
» Where would you put the initialisation in component?
The best place to initialise your components is in the ngOnInit lifecycle hook and not the constructor because only at this point have any input property bindings been processed. The reason we use ngOnInit and not ngOnChanges to initialise a component is that ngOnInit is only called once whereas ngOnChanges is called for every change to the input properties.
» Subject in Angular (RxJs)?
RxJS Subject is special type of Observable that allows values to be multicasted to many Observers.
Subjects are like EventEmitters: they maintain a registry of many listeners.
Subjects will make sure each subscription gets the exact same value as the Observable execution is shared among the subscribers.
Example:
<script src="https://unpkg.com/@reactivex/rxjs@5.3.0/dist/global/Rx.js"></script>

<button>Click me</button>
<div></div>
// Instantiating a new obj using Rx.Subject() constructor function
var clickEmitted = new Rx.Subject();

// Accessing button and div using query selector
var button = document.querySelector('button');
var div = document.querySelector('div');


// Attaching click event using an addEventListener
// and on click of it calling next method from clickEmitted
button.addEventListener('click', () =>
 clickEmitted.next('Clicked!')
);

// Now using subscribe method we can access the value which we are passing
// on next method
clickEmitted.subscribe((value) =>
 div.textContent = value
);
One more example:
Every Subject is an Observer. It is an object with the methods next(v), error(e), and complete(). To feed a new value to the Subject, just call next(theValue), and it will be multicasted to the Observers registered to listen to the Subject.
var subject = new Rx.Subject();

subject.subscribe({
 next: function(value) {
   console.log(value);
  },
  error: function(error) {
   console.log(error);
  },
  complete: function() {
   console.log('Complete');
  }
});

subject.subscribe({
 next: function(value) {
   console.log(value);
  }
});

subject.next('A new data piece');
subject.complete();
subject.next('New value');
» BehaviourSubject in Angular (RxJs)?
One of the variants of Subjects is the BehaviorSubject. The BehaviorSubject has the characteristic that it stores the “current” value. This means that you can always directly get the last emitted value from the BehaviorSubject.
BehaviorSubjects are useful for representing "values over time". For instance, an event stream of birthdays is a Subject, but the stream of a person's age would be a BehaviorSubject.
Lets see the previous example with BehaviorSubject
<script src="https://unpkg.com/@reactivex/rxjs@5.3.0/dist/global/Rx.js"></script>

<button>Click me</button>
<div></div>
// here we have provided an initial value to BehaviorSubject
var clickEmitted = new Rx.BehaviorSubject('Not clicked');
var button = document.querySelector('button');
var div = document.querySelector('div');

button.addEventListener('click', () => clickEmitted.next('Clicked!'));

clickEmitted.subscribe((value) => {
 div.textContent = value
});
» What is Microsservices?
- It is the way to split your application into set of smaller, interconnected services instead of building single monolithic application.
- Each Microsservices has its own architecture consisting of it's own business logic.
- Benefits of Microsservices is that you can test these services as their own and different developer's teams on their own or all of them can be released individually to production at a time.
» CSR vs SRR (Client Side Rending vs Server Side Rendering)
Advantages of CSR (Client Side Rendering)
- CSR has rich interactions because we able to load just parts of the page like web apps instead of websites.
- In CSR rendering also has a faster response from the server because the server doesn't have to render the HTML page or do any extra work. All it needs to do is just send that tiny little HTML file. The server actually responds a lot faster with client side rendering.
- CSR is great for Web applications, not just because it has rich interactions, but because it's a faster website experience after the initial load. So after the JavaScript has worked through and has created the view for us because we already have everything loaded on like server side rendering where we have to go back again to the server and make that request.
- All our JavaScript is loaded, all our views are there so that we're able to interact really fast and modify only parts of the page based on The View.
Disadvantages of CSR (Client Side Rendering)
- It has low SEO (Search Engine Optimization) potential because in CSR we render a HTML page or in ReactJs a simple DIV tag and the way SEO works in browsers like Google Chrome, they have their own crowlers (algorithms) that search through websites, see what the websites are about, and then put them into their database to understand what they're about. So in CSR the crowlers gets less information about your websites which affects on it's SEO.
- CSR has longer initial load, although we get a faster response from the server because we have JavaScript that needs to render our Web page, we have a faster initial load than server side rendered apps, so we see that loading screen or blank page a lot longer than a server side rendered up initially. For most users, these types of applications will feel a lot slower.
Advantages of SSR (Server Side Rendering)
- Good at SEO because it's rendered on the server and when the browser's searches for it, it already has everything.
- Good for statics site where you don't have much dynamic interactions and complex user interface.
- Initial page load is faster because SSR apps are rendered on the server to the user.
Disdvantages of SSR (Server Side Rendering)
- Full page reload becuase we have to request a new page from server.
- It's a synchronous mechanism because it holds up the event loop so the server isn't able to process any other request until this completes.
» How would you ensure data consistency and synchronization in a complex frontend application with multiple components and data sources?
1. Centralized State Management: Utilize centralized state management solutions like Redux, Vuex, or NgRx to manage application state. This ensures that all components have access to the same data, minimizing data inconsistencies.
2. Immutable Data: Represent state using immutable data structures to prevent unintended modifications and maintain data consistency. Libraries like Immutable.js can assist in managing immutable data.
3. Event Bus or Pub/Sub Pattern: Implement an event bus or Pub/Sub pattern to facilitate communication between components, enabling them to react to data changes without direct interaction. Vue's EventBus or custom event systems can be used for this purpose.
4. Real-Time Data Updates: Use WebSockets or Server-Sent Events (SSE) to receive real-time updates from the server, ensuring that all clients receive data updates simultaneously and keeping their views synchronized.
5. Polling or Long-Polling: Employ polling or long-polling mechanisms to periodically fetch data from the server, ensuring that clients have access to the latest data at regular intervals and reducing the risk of data inconsistencies.
6. Optimistic Updates: Implement optimistic updates to provide immediate feedback to users while asynchronously syncing changes with the server. This enhances perceived performance and reduces conflicts.
7. Transaction Management: Use transaction management techniques to maintain atomicity, consistency, isolation, and durability (ACID) properties when modifying data, ensuring data consistency and integrity.
8. Error Handling and Conflict Resolution: Implement robust error handling mechanisms to manage network errors, server failures, and conflicts arising from concurrent updates. Provide clear feedback to users and employ conflict resolution strategies to resolve conflicts gracefully.
9. Versioning and Timestamps: Employ versioning or timestamps to track data changes and detect conflicts. Include version information or timestamps when updating data to ensure changes are applied in the correct order and conflicts are resolved appropriately.
By implementing these strategies, data consistency and synchronization can be ensured in a complex frontend application with multiple components and data sources, providing users with a seamless and reliable experience.
» How would you design a secure frontend architecture to mitigate common security threats like cross-site scripting (XSS) and cross-site request forgery (CSRF)?
1. Use Content Security Policy (CSP): Implement CSP headers to mitigate XSS attacks by specifying trusted sources for loading resources. CSP helps prevent the execution of malicious scripts injected into web pages.
2. Input Validation and Sanitization: Validate and sanitize all user inputs on the client side to prevent XSS attacks. Utilize libraries like DOMPurify to sanitize input data and remove potentially harmful content before rendering it in the browser.
3. Escape User-Generated Content: When dynamically generating HTML content, escape user-generated data to treat special characters as literals. Employ techniques like HTML escaping to prevent XSS vulnerabilities.
4. Use HTTPS: Always serve your website over HTTPS to encrypt data transmitted between the client and server, preventing man-in-the-middle attacks and eavesdropping. HTTPS ensures the protection of sensitive user data.
5. Implement CSRF Tokens: Mitigate CSRF attacks by generating and validating unique CSRF tokens for each user session. Include CSRF tokens in state-changing requests and validate them on the server side to prevent unauthorized requests.
6. Same-Site Cookies: Set the SameSite attribute for cookies to restrict their usage to the same site or origin, preventing CSRF attacks by restricting cookie usage in cross-origin requests.
7. Use Secure and HttpOnly Cookies: Set the Secure and HttpOnly attributes for cookies to prevent client-side script access and ensure cookies are only sent over secure HTTPS connections.
8. Implement Role-Based Access Control (RBAC): Enforce access controls based on user roles and permissions to restrict access to sensitive features and data. Implement RBAC on both the client and server sides to prevent unauthorized access.
9. Regular Security Audits and Penetration Testing: Conduct regular security audits and penetration testing to identify and address security vulnerabilities in your frontend architecture. Test for common security flaws, including XSS and CSRF vulnerabilities, and address any issues promptly.
10. Security Awareness Training: Educate developers, designers, and stakeholders about common security threats and best practices for secure frontend development. Promote a security-aware culture to prioritize security throughout the development lifecycle.
By implementing these security measures, you can design a secure frontend architecture that effectively mitigates common security threats like XSS and CSRF, safeguarding your application and user data from malicious attacks and unauthorized access.
» Strategies to Optimize the Performance of a Large-Scale Frontend Application
1. Code Splitting: Split your application code into smaller, manageable chunks and only load the necessary code when required. This reduces the initial load time and improves overall performance.
2. Lazy Loading: Implement lazy loading for components and routes to load them asynchronously when needed. This prevents unnecessary resources from being loaded upfront and improves the time-to-interactivity of the application.
3. Bundle Optimization: Use tools like webpack or Parcel to optimize and minimize bundle size. This includes tree shaking, minification, and compression techniques to reduce the size of JavaScript, CSS, and other assets.
4. Image Optimization: Optimize images by compressing them and using modern image formats (e.g., WebP) to reduce file size without compromising quality. Lazy loading images and using responsive images can also improve performance.
5. CDN Integration: Utilize Content Delivery Networks (CDNs) to cache static assets and deliver them from edge locations closer to the user. This reduces latency and speeds up content delivery, especially for users located far from the origin server.
6. Client-Side Caching: Leverage browser caching mechanisms such as service workers, localStorage, and sessionStorage to cache data and resources locally. This reduces the need for repeated requests to the server and improves performance.
7. Performance Monitoring: Use tools like Google Lighthouse, WebPageTest, or browser developer tools to analyze and monitor the performance of your application. Identify performance bottlenecks and areas for improvement, and continuously optimize based on data-driven insights.
8. Prefetching and Preloading: Prefetch critical resources (e.g., scripts, stylesheets) or preloading important content to reduce latency and improve perceived performance. Anticipate user actions and preload resources accordingly to provide a seamless browsing experience.
9. Critical CSS and JavaScript: Extract and inline critical CSS and JavaScript needed for initial page rendering to minimize render-blocking resources. Prioritize loading essential content first to improve the perceived loading speed of the page.
10. Progressive Web App (PWA) Features: Implement PWA features such as offline support, push notifications, and background sync to enhance user experience and performance. PWAs enable faster load times and provide a native app-like experience on the web.
By implementing these strategies, you can optimize the performance of your large-scale frontend application, ensuring faster load times, improved user experience, and better overall performance.
» The Role of State Management Libraries in Frontend Architecture
1. Centralized State: State management libraries such as Redux (for React) and Vuex (for Vue.js) provide a centralized store for managing application state. They act as a single source of truth, where all components can access and update application data.
2. Predictable State Changes: These libraries enforce a strict unidirectional data flow, making it easier to predict and debug state changes in the application. Actions are dispatched to modify the state, ensuring that changes are predictable and traceable.
3. Separation of Concerns: State management libraries promote separation of concerns by decoupling state management logic from presentation components. Components focus on rendering UI based on the current state, while state management logic resides in separate modules.
4. Scalability: As applications grow in complexity, managing state becomes more challenging. State management libraries offer scalable solutions for managing state in large-scale applications, ensuring performance and maintainability as the application evolves.
5. Middleware Support: Redux and Vuex provide middleware support, allowing developers to intercept and modify actions before they reach the reducers. Middleware enables additional functionality such as logging, async operations, and API requests.
6. Time Travel Debugging: State management libraries often come with debugging tools that enable time travel debugging. Developers can inspect and replay actions to understand how the state changes over time, aiding in debugging and troubleshooting.
7. Integration with DevTools: Redux and Vuex integrate seamlessly with browser developer tools, providing enhanced debugging capabilities. Developers can monitor state changes, action dispatches, and performance metrics directly from the browser.
8. Ecosystem and Community: Both Redux and Vuex have vibrant ecosystems and active communities, offering a wide range of plugins, extensions, and best practices. Developers can leverage community-contributed tools and resources to streamline development and enhance productivity.
9. Compatibility with Frameworks: State management libraries are designed to work seamlessly with popular frontend frameworks like React and Vue.js. They provide official integrations and support, ensuring compatibility and ease of use within the framework ecosystem.
10. Facilitates Testing: By centralizing state management logic, these libraries make it easier to test application logic and state transitions. Developers can write unit tests for actions, reducers, and selectors, ensuring the correctness of state management logic.
Overall, state management libraries like Redux and Vuex play a crucial role in frontend architecture by providing a scalable, predictable, and centralized approach to managing application state. They enhance developer productivity, simplify state management, and improve the overall quality and maintainability of frontend applications.
» Approach to Code Splitting and Bundling in Frontend Development
Code splitting and bundling are essential techniques in frontend development to improve page load times and reduce initial payload size. Here's an approach to implementing them:
1. Identify Code Splitting Opportunities: Analyze your application's architecture to identify code-splitting opportunities. Determine which parts of the application can be loaded asynchronously and split them into separate bundles.
2. Use Dynamic Imports: Utilize dynamic imports to split code at runtime based on user interactions or route changes. Instead of importing entire modules upfront, dynamically load them when needed, reducing the initial payload size.
3. Configure Webpack or Parcel: If you're using Webpack or Parcel bundlers, configure them to support code splitting. Webpack's import() function or Parcel's automatic code splitting feature can be used to split bundles based on dynamic imports.
4. Example of Code Splitting with React Router: Below is a simple example of code splitting with React Router:
import React, { Suspense, lazy } from 'react';
import { BrowserRouter as Router, Route, Switch } from 'react-router-dom';

const Home = lazy(() => import('./components/Home'));
const About = lazy(() => import('./components/About'));
const Contact = lazy(() => import('./components/Contact'));

function App() {
  return (
    <Router>
      <Suspense fallback={<div>Loading...</div>}>
        <Switch>
          <Route path="/" exact component={Home} />
          <Route path="/about" component={About} />
          <Route path="/contact" component={Contact} />
        </Switch>
      </Suspense>
    </Router>
  );
}

export default App;
In this example, components like Home, About, and Contact are loaded asynchronously using dynamic imports. When a user navigates to a specific route, only the corresponding component code is loaded, reducing the initial payload size.
5. Monitor Performance: Continuously monitor the performance of your application using tools like Google Lighthouse or browser developer tools. Analyze metrics like Time to First Byte (TTFB), First Contentful Paint (FCP), and Total Blocking Time (TBT) to identify areas for improvement.
6. Optimize Bundling: Configure bundler settings to optimize bundle size through techniques like tree shaking, minification, and compression. Remove unused code, minify JavaScript and CSS files, and enable gzip or Brotli compression to reduce bundle size.
7. Test and Iterate: Test your application across different devices, network conditions, and browsers to ensure optimal performance. Iterate on code splitting and bundling strategies based on performance metrics and user feedback.
By adopting these approaches, you can effectively implement code splitting and bundling in your frontend development workflow to improve page load times, reduce initial payload size, and enhance overall user experience.
» You notice that your application's performance degrades over time. How would you identify and mitigate memory leaks in a large-scale web application?
Example: Suppose you have a full-stack web application built with Angular on the frontend and Node.js on the backend. Users have reported experiencing sluggish performance and occasional freezes after extended usage.
1. Monitoring: Start by monitoring memory usage in both the frontend and backend components of your application using browser developer tools and Node.js monitoring tools like PM2 or Node.js Inspector.
2. Heap Snapshots: Take heap snapshots periodically to analyze memory usage patterns in the frontend Angular application and backend Node.js server. Look for excessive memory allocations and objects that are retained in memory longer than necessary.
3. DOM Manipulation: Review Angular components and services that manipulate the DOM, especially those dealing with dynamic content rendering or frequent updates. Check for memory-intensive operations such as creating large numbers of DOM elements or attaching event listeners.
4. Event Listeners: Investigate event listeners attached to DOM elements in Angular components and ensure they are properly removed when components are destroyed or no longer needed. Use Angular lifecycle hooks like ngOnDestroy to clean up resources and unsubscribe from observables.
5. Backend Memory Profiling: Use Node.js memory profilers like heapdump or built-in diagnostic tools to analyze memory usage in the backend server. Look for memory leaks in long-running processes, database connections, or cached data structures.
6. Code Review and Testing: Conduct thorough code reviews of both frontend and backend codebases to identify potential memory leak sources such as unclosed database connections, unbounded arrays, or inefficient data processing algorithms. Implement unit tests and integration tests to validate memory management behavior under various scenarios.
7. Optimization and Remediation: Once memory leaks are identified, prioritize optimization efforts to address the most critical issues first. Optimize frontend code by minimizing DOM manipulations, reducing object allocations, and optimizing data structures. In the backend, optimize database queries, implement connection pooling, and optimize memory-intensive algorithms.
8. Continuous Monitoring: Implement continuous monitoring and alerting mechanisms to detect memory leaks in production environments proactively. Set up alarms based on memory thresholds and anomalies to trigger alerts when memory usage exceeds predefined limits.
By following these steps and leveraging appropriate tools and techniques, you can effectively identify and mitigate memory leaks in your full-stack web application, ensuring optimal performance and reliability for your users.
» Users report intermittent issues with uploading files to the application. What steps would you take to troubleshoot and resolve this problem, considering potential server-side and client-side factors?
1. Server-Side Troubleshooting:
- Check Server Logs: Start by examining server logs to identify any errors or warnings related to file uploads. Look for messages indicating failed or incomplete uploads, network timeouts, or resource exhaustion.
- Review Server Configuration: Verify server configurations related to file size limits, upload timeouts, and memory settings. Ensure that the server is configured to handle large file uploads efficiently without exceeding resource limits.
- Monitor Network Traffic: Use network monitoring tools to analyze network traffic between the client and server during file uploads. Look for signs of network congestion, packet loss, or connectivity issues that could affect upload reliability.
- Test File Upload Endpoint: Manually test the file upload endpoint using tools like cURL or Postman to simulate file uploads and identify any issues with the server-side implementation. Verify that the endpoint responds correctly to file upload requests and handles errors gracefully.
- Check File Storage: Ensure that the server has sufficient disk space and permissions to store uploaded files. Check for any file system issues that could prevent successful file storage or retrieval.
2. Client-Side Troubleshooting:
- Check Browser Console: Inspect browser developer console for any JavaScript errors or warnings related to file uploads. Look for network errors, CORS issues, or JavaScript exceptions that could interfere with file upload functionality.
- Review Client-Side Code: Review client-side code responsible for initiating file uploads, handling progress events, and processing server responses. Ensure that the code correctly constructs file upload requests and handles any errors or timeouts.
- Test Across Browsers: Test file uploads across different web browsers to identify any browser-specific issues or inconsistencies. Pay attention to browser compatibility issues related to file input elements, FormData objects, and XHR requests.
- Check Network Conditions: Test file uploads under various network conditions, such as high latency or low bandwidth, to simulate real-world usage scenarios. Use network throttling tools in browser developer tools to adjust network conditions for testing.
» Your application's search feature is slow when handling large datasets. Describe strategies for optimizing search functionality, including indexing, caching, and query optimization techniques.
To optimize the search functionality of your application, especially when dealing with large datasets, several strategies can be employed:
- Indexing: Implement indexing on the database fields used for search queries. Indexing improves search performance by creating a data structure that allows the database engine to quickly locate rows matching specific criteria. Ensure that relevant columns are indexed based on the search criteria, such as text fields for full-text search or numeric fields for range queries.
- Caching: Utilize caching mechanisms to store frequently accessed search results or query responses. Cached results can be served quickly to users without the need to execute costly database queries repeatedly. Consider implementing a caching layer using technologies like Redis or Memcached to store search results temporarily and invalidate cache entries when underlying data changes.
- Query Optimization: Optimize search queries to minimize execution time and resource usage. Use database query optimization techniques such as query rewriting, query hints, and query plan analysis to ensure efficient retrieval of search results. Consider leveraging database features like stored procedures, views, or materialized views to precompute and cache query results.
- Pagination: Implement pagination to limit the number of search results returned per page, reducing the load on both the database and the application server. Paginating search results allows users to navigate through large datasets incrementally, improving performance and user experience.
- Asynchronous Processing: Handle search queries asynchronously to avoid blocking the application server and improve responsiveness. Use asynchronous programming techniques or offload search tasks to background job queues or worker processes. This approach allows the application server to handle incoming requests without waiting for search queries to complete.
- Data Denormalization: Consider denormalizing data structures to optimize search performance for specific use cases. Denormalization involves duplicating or precomputing data to eliminate the need for complex joins or calculations during search queries. This approach can improve search speed but requires careful consideration of data consistency and maintenance overhead.
- Load Balancing and Horizontal Scaling: Distribute search queries across multiple servers or instances to distribute the workload and increase throughput. Implement load balancing techniques to evenly distribute incoming search requests among backend servers. Horizontal scaling allows the application to handle a higher volume of concurrent search queries by adding more computing resources as needed.
- Query Logging and Monitoring: Monitor search query performance and identify bottlenecks using query logging and performance monitoring tools. Track metrics such as query execution time, database load, and resource utilization to identify areas for optimization. Use query profiling tools provided by the database management system to analyze and optimize slow-performing queries.
By implementing these strategies, you can significantly improve the performance of your application's search functionality, even when dealing with large datasets. It's essential to continually monitor and optimize search performance to ensure optimal user experience and efficient resource utilization.
Example: Node.js Backend (using Express.js and MongoDB):
Indexing and Query Optimization:
Ensure relevant fields in MongoDB collections are indexed based on search criteria.
Caching:
Implement caching using Redis to store frequently accessed search results.
Asynchronous Processing:
Handle search queries asynchronously using asynchronous functions or by offloading search tasks to background job queues.
server.js
const express = require('express');
const mongoose = require('mongoose');
const redis = require('redis');

const app = express();
const PORT = process.env.PORT || 3000;

// Connect to MongoDB
mongoose.connect('mongodb://localhost:27017/mydatabase', { useNewUrlParser: true, useUnifiedTopology: true });
const db = mongoose.connection;
db.once('open', () => {
    console.log('Connected to MongoDB');
});

// Connect to Redis
const redisClient = redis.createClient();
redisClient.on('connect', () => {
    console.log('Connected to Redis');
});

// Search route
app.get('/search', async (req, res) => {
    const searchTerm = req.query.q;

    // Check Redis cache for cached search results
    redisClient.get(searchTerm, async (err, cachedResults) => {
        if (err) throw err;

        if (cachedResults) {
            console.log('Returning cached search results');
            return res.json(JSON.parse(cachedResults));
        } else {
            // Perform database query asynchronously
            const searchResults = await performSearch(searchTerm);

            // Cache search results in Redis for future use
            redisClient.setex(searchTerm, 3600, JSON.stringify(searchResults));

            console.log('Returning fresh search results');
            return res.json(searchResults);
        }
    });
});

// Perform search query in MongoDB
async function performSearch(searchTerm) {
    return await MyModel.find({ $text: { $search: searchTerm } }).limit(10).exec();
}

app.listen(PORT, () => {
    console.log(`Server is running on port ${PORT}`);
});
Angular Frontend:
Pagination:
Implement pagination in Angular frontend to limit the number of search results displayed per page.
Asynchronous Processing:
Handle search requests asynchronously using Angular's HttpClient.
search.component.ts:
import { Component } from '@angular/core';
import { HttpClient } from '@angular/common/http';

@Component({
    selector: 'app-search',
    templateUrl: './search.component.html'
})
export class SearchComponent {
    searchTerm: string;
    searchResults: any[];

    constructor(private http: HttpClient) {}

    search(): void {
        this.http.get<any[]>('/search', { params: { q: this.searchTerm } }).subscribe(
            (data) => {
                this.searchResults = data;
            },
            (error) => {
                console.error('Error fetching search results:', error);
            }
        );
    }
}
<div>
    <input type="text" [(ngModel)]="searchTerm">
    <button (click)="search()">Search</button>
</div>

<div *ngIf="searchResults && searchResults.length">
    <ul>
        <li *ngFor="let result of searchResults">
            {{ result.name }}
        </li>
    </ul>
</div>
This example demonstrates how to optimize search functionality in an Angular 13 frontend and a Node.js backend using various techniques such as indexing, caching, pagination, and asynchronous processing.
» A third-party API that your application relies on is frequently timing out or returning errors. What strategies would you implement to improve reliability and resilience when interacting with external services?
1. Identify Root Cause:
Begin by investigating the reasons behind the frequent timeouts or errors from the third-party API. Common causes may include network issues, API rate limiting, server-side errors, or changes in the API's behavior.
2. Error Handling and Retry Mechanism:
Implement robust error handling mechanisms in your application to gracefully handle API timeouts and errors. Use retry mechanisms to automatically retry failed requests with exponential backoff to avoid overwhelming the API server.
Example:
Suppose your application integrates with a payment gateway API to process payments. If the payment gateway API returns a timeout error due to high traffic or network issues, implement a retry mechanism with backoff logic to retry the payment request after a short delay. This ensures that failed payments are retried automatically without manual intervention.
3. Circuit Breaker Pattern:
Implement the Circuit Breaker pattern to prevent cascading failures and conserve resources when interacting with unreliable APIs. The Circuit Breaker monitors the status of external services and temporarily stops sending requests if it detects repeated failures. It can be configured to reopen after a specified period or after successful responses.
Example:
Continuing with the payment gateway API example, if the API consistently returns errors for a certain period, the Circuit Breaker can temporarily block further payment requests to prevent overloading the API and notify administrators to investigate the issue.
4. Fallback Mechanism:
Implement fallback mechanisms to provide alternative responses or functionality when the third-party API is unavailable or experiencing issues. Fallbacks can include serving cached data, default values, or alternative services to ensure continuity of essential functionality.
Example:
In an e-commerce application, if the product recommendation API is unavailable, implement a fallback mechanism to display generic recommendations or popular products based on historical data stored locally in the application.
5. Monitoring and Alerting:
Implement comprehensive monitoring and alerting systems to track the performance and availability of external services in real-time. Set up alerts to notify administrators or support teams immediately when API errors or timeouts occur beyond acceptable thresholds.
Example:
Use tools like Prometheus and Grafana to monitor API response times, error rates, and availability. Configure alerting rules to trigger notifications via email, Slack, or SMS when predefined thresholds are exceeded.
» You are tasked with implementing a real-time collaboration feature in the application, allowing multiple users to edit shared documents simultaneously. Describe the architecture and technologies you would use to achieve this, including WebSocket communication and conflict resolution strategies.
Consider example of a collaborative document editing application, similar to Google Docs.
Architecture and Technologies
1. Frontend
The frontend of the application can be built using a modern JavaScript framework like **React.js** or **Vue.js**. These frameworks provide a responsive and interactive user interface.
2. Backend
The backend can be built using **Node.js** with **Express.js**. Node.js is a good choice because it's JavaScript, like the frontend, which can simplify development.
3. Database
A database like **MongoDB** or **PostgreSQL** can be used to store the documents, user information, and edit history.
4. Real-time Communication
To allow real-time collaboration, we can use **WebSocket** protocol which provides full-duplex communication channels over a single TCP connection. This means the server can push updates to the client without waiting for a request, which is perfect for a collaborative editing environment.
Conflict Resolution Strategies
When multiple users are editing a document simultaneously, conflicts can occur. Here are some strategies to handle them:
1. Operational Transformation (OT)
OT is a technology used in real-time collaborative applications to handle synchronization. It allows multiple users to make changes to a document that will eventually converge to the same value, even if the changes are made concurrently.
2. Last Write Wins (LWW)
In this strategy, the system simply accepts the last operation it receives and discards the others. This is the simplest strategy but can lead to data loss if not handled carefully.
3. Conflict-free Replicated Data Type (CRDT)
CRDTs are data structures that allow concurrent updates from multiple users and ensure that the result is the same, regardless of the order of the updates.
Example Code
Here's a simple example of how you might set up a WebSocket server in Node.js using the `ws` library:
const WebSocket = require('ws');

const wss = new WebSocket.Server({ port: 8080 });

wss.on('connection', ws => {
  ws.on('message', message => {
    // Broadcast the message to all clients
    wss.clients.forEach(client => {
      if (client.readyState === WebSocket.OPEN) {
        client.send(message);
      }
    });
  });
});
In this code, whenever a message is received from a client, it is broadcasted to all connected clients. This could represent an edit to the document, which needs to be seen by all users.
» The application's authentication system is experiencing security vulnerabilities and frequent brute-force attacks. How would you enhance the security of the authentication mechanism, including implementing multi-factor authentication and rate limiting?
1. Multi-Factor Authentication (MFA)
MFA adds an extra layer of security by requiring users to provide at least two forms of identification before granting access. These factors can include something the user knows (password), something the user has (security token or a smartphone), or something the user is (biometric data, like fingerprints or facial recognition).
Implementing MFA can be done using various libraries and services. For instance, if you're using Node.js, libraries such as `passport` provide strategies for implementing MFA. Services like Google Authenticator or Authy can also be integrated into your application for generating and validating tokens.
2. Rate Limiting
Rate limiting controls the number of requests a client can make to your server in a specific timeframe. This is particularly effective against brute-force attacks as it limits the number of attempts an attacker can make.
Express.js has middleware like `express-rate-limit` for setting up rate limiting. Here's a basic example:
const rateLimit = require("express-rate-limit");

const limiter = rateLimit({
  windowMs: 15 * 60 * 1000, // 15 minutes
  max: 100 // limit each IP to 100 requests per windowMs
});

//  apply to all requests
app.use(limiter);
3. Password Policies
Enforce strong password policies. This might include minimum length, requiring a mix of characters (numbers, symbols, upper and lower case letters), and not matching the user's personal information.
4. Account Lockouts
After a certain number of failed login attempts, temporarily lock the account. Notify the user via email when this happens.
5. HTTPS
Use HTTPS for all communication between the client and server to prevent man-in-the-middle attacks. This ensures that the user's credentials are sent over a secure, encrypted connection.
6. Regular Updates and Security Patches
Keep your system, especially your libraries and frameworks, updated. Regularly check for any security patches and apply them as soon as possible.
» You discover that the application's database queries are not optimized, leading to slow response times and high database load. Explain techniques for optimizing database performance, such as query tuning, indexing, and denormalization.
Optimizing database performance is crucial for ensuring that an application can handle high loads and respond quickly to user requests. Here are several techniques for optimizing database performance:
1. Query Tuning:
- Review and optimize the application's database queries to ensure they are efficient and selective.
- Identify and eliminate unnecessary or redundant queries, such as fetching more data than needed or performing multiple round trips to the database.
- Use query analyzers and performance monitoring tools to identify slow or inefficient queries that may be causing performance bottlenecks.
- Rewrite queries to leverage database features such as joins, subqueries, and aggregations more effectively.
Example:

   -- Before query optimization
   SELECT * FROM orders WHERE customer_id = 123;

   -- After query optimization (using index)
   SELECT * FROM orders WHERE customer_id = 123;
2. Indexing:
- Create indexes on columns frequently used in WHERE clauses, JOIN conditions, or ORDER BY clauses to speed up data retrieval.
- Consider using composite indexes for queries that involve multiple columns.
- Regularly monitor and maintain indexes to ensure they remain effective as data volumes grow and usage patterns change.
Example:
   sql
   -- Create index on customer_id column
   CREATE INDEX idx_customer_id ON orders (customer_id);
3. Denormalization:
- Denormalize database schemas by storing redundant or precomputed data to reduce the need for complex joins and improve query performance.
- Use denormalization judiciously, considering trade-offs between data redundancy and query performance gains.
- Monitor and maintain denormalized data to ensure consistency and integrity across the database.
Example:

   sql

   -- Original normalized schema
   CREATE TABLE customers (
       id INT PRIMARY KEY,
       name VARCHAR(100)
   );

   CREATE TABLE orders (
       id INT PRIMARY KEY,
       customer_id INT,
       amount DECIMAL(10, 2),
       FOREIGN KEY (customer_id) REFERENCES customers(id)
   );

   -- Denormalized schema (with redundant customer_name column)
   CREATE TABLE orders (
       id INT PRIMARY KEY,
       customer_id INT,
       customer_name VARCHAR(100),
       amount DECIMAL(10, 2),
       FOREIGN KEY (customer_id) REFERENCES customers(id)
   );
4. Partitioning:
- Partition large tables into smaller, more manageable segments based on certain criteria such as date ranges or key ranges.
- Distribute data across multiple physical storage devices or servers to improve query performance and scalability.
- Use partition pruning techniques to optimize query execution and reduce the amount of data scanned.
Example:
   sql
   -- Partitioning by date range
   CREATE TABLE logs (
       id INT PRIMARY KEY,
       log_date DATE,
       ...
   ) PARTITION BY RANGE (log_date) (
       PARTITION p1 VALUES LESS THAN ('2022-01-01'),
       PARTITION p2 VALUES LESS THAN ('2023-01-01'),
       PARTITION p3 VALUES LESS THAN (MAXVALUE)
   );
» The application experiences a sudden surge in traffic during peak hours, leading to server overload and degraded performance. How would you scale the application horizontally and vertically to handle increased load, including strategies such as load balancing, auto-scaling, and caching?
1. Horizontal Scaling:
- Load Balancing: Implement a load balancer to distribute incoming traffic across multiple server instances. This ensures that no single server becomes overloaded and helps improve fault tolerance and reliability.
- Auto-Scaling: Use auto-scaling groups in cloud environments to automatically add or remove server instances based on predefined metrics such as CPU utilization, memory usage, or request throughput. This allows the application to dynamically adjust its capacity to handle fluctuations in traffic.
- Containerization: Containerize application components using technologies like Docker and Kubernetes to enable easier deployment, scaling, and management of microservices-based architectures.
2. Vertical Scaling:
- Upgrade Hardware: Increase the resources (CPU, memory, disk space) of existing server instances to handle higher loads. This approach is known as vertical scaling or scaling up.
- Database Sharding: For databases, implement sharding techniques to horizontally partition data across multiple servers. Each shard handles a subset of the data, allowing the database to scale horizontally as data volumes increase.
3. Caching:
- Content Delivery Networks (CDNs): Use CDNs to cache static assets (such as images, CSS, and JavaScript files) at edge locations closer to end-users. This reduces latency and offloads traffic from the origin server.
- In-Memory Caching: Implement in-memory caching solutions (e.g., Redis, Memcached) to store frequently accessed data in memory. This reduces the need to fetch data from the database on every request, improving response times and reducing database load.
4. Optimizing Resource Usage:
- Efficient Resource Allocation: Monitor resource utilization across servers and containers to identify underutilized or overutilized instances. Optimize resource allocation to ensure efficient use of compute resources.
- Performance Tuning: Continuously monitor and optimize application performance, database queries, and system configurations to eliminate bottlenecks and improve overall efficiency.
5. Fault Tolerance and High Availability:
- Redundancy: Deploy redundant components (e.g., redundant load balancers, replicated databases) across multiple availability zones or regions to ensure high availability and fault tolerance.
- Failover Mechanisms: Implement failover mechanisms to automatically redirect traffic to healthy server instances or backup systems in case of failures or outages.
By implementing a combination of horizontal and vertical scaling techniques, along with load balancing, auto-scaling, caching, and optimization strategies, you can effectively handle increased traffic during peak hours and maintain optimal performance and reliability for your application.
» The application's performance varies significantly across different devices and browsers. Explain techniques for optimizing cross-browser and cross-device compatibility, including responsive design, browser testing, and feature detection.
1. Responsive Design:
- Media Queries: Use CSS media queries to create responsive layouts that adapt to different screen sizes and resolutions.
- Fluid Layouts: Design fluid layouts that stretch and shrink based on available screen space, ensuring content remains accessible and readable.
- Viewport Meta Tag: Include the viewport meta tag in your HTML to control the viewport's size and scale on mobile devices.
2. Browser Testing:
- Cross-Browser Testing: Test your application across different web browsers to identify and address any browser-specific issues or inconsistencies.
- Device Testing: Test your application on various devices to ensure compatibility and optimal performance across different form factors and screen resolutions.
- User Agent Sniffing: Detect the user agent string to apply specific CSS styles or JavaScript enhancements tailored to different browsers or devices.
3. Feature Detection:
- Modernizr Library: Use the Modernizr JavaScript library to detect browser features and capabilities.
- Feature-Polyfill Libraries: Include polyfill libraries to add support for modern JavaScript features in older browsers.
4. Progressive Enhancement:
- Graceful Degradation: Implement progressive enhancement by providing a baseline experience that works across all browsers and devices.
- Accessibility Considerations: Ensure that your application is accessible to users with disabilities by following web accessibility guidelines.
5. Performance Optimization:
- Optimized Assets: Minify and concatenate CSS and JavaScript files, and optimize image assets to improve loading times.
- Network Performance: Reduce HTTP requests, leverage browser caching, and use CDNs to distribute assets closer to users.
- Code Splitting: Implement code splitting techniques to load application chunks asynchronously and improve perceived performance.
» The application needs to support multi-tenancy, allowing different organizations or customers to use the system while ensuring data isolation and security. Describe how you would architect the application to achieve multi-tenancy, including database partitioning, authentication, and access control mechanisms.
1. Database Partitioning:
- Shared Database with Separate Schemas: Utilize a shared database where each tenant has its own schema, ensuring data isolation while maintaining a single database instance.
- Separate Databases: Alternatively, use separate database instances for each tenant to achieve stronger isolation, albeit with increased resource requirements.
2. Authentication and Access Control:
- Single Sign-On (SSO): Implement a unified login mechanism using protocols like OAuth or SAML for authentication across tenants.
- Tenant-Aware Authorization: Use RBAC or ABAC mechanisms at the tenant level to control access to resources and data.
- Scoped Resource Access: Ensure data isolation by implementing data filtering or row-level security mechanisms at the database level.
3. Application Architecture:
- Multi-Tenant Middleware: Design middleware to handle tenant resolution, authentication, and authorization logic before forwarding requests to the application.
- Tenant Configuration: Allow customization through a dedicated administration interface, storing tenant-specific settings centrally.
- Isolated Components: Design components to be tenant-aware and isolated to prevent impacts on other tenants.
4. Monitoring and Management:
- Tenant Performance Isolation: Implement measures to prevent resource-intensive tenants from impacting overall system performance.
- Usage Reporting and Billing: Track resource consumption per tenant for usage-based billing and generate usage reports.
» A new regulatory requirement mandates the implementation of data privacy and compliance measures (e.g., GDPR, HIPAA). Describe how you would ensure compliance with data protection regulations, including data encryption, access controls, audit logging, and user consent management.
1. Data Encryption:
- Encrypt sensitive data: Encrypt data at rest and in transit using strong encryption algorithms like AES-256.
- Example: Use SSL/TLS encryption for secure communication and encryption libraries such as OpenSSL for data stored in databases.
2. Access Controls:
- Implement RBAC: Restrict access to sensitive data based on user roles and least privilege principles.
- Example: Employ frameworks like Spring Security or Passport.js to enforce access controls at the application level.
3. Audit Logging:
- Log access and modification events: Capture all actions related to sensitive data and store audit logs securely.
- Example: Use logging frameworks like Log4j or Winston, and configure log management tools like Splunk or ELK stack for analysis.
4. User Consent Management:
- Obtain explicit consent: Obtain user consent before collecting, processing, or sharing personal data.
- Example: Implement consent management features to present consent forms and allow users to manage their privacy settings.
5. Data Minimization:
- Limit data collection: Collect and retain only necessary personal data, and anonymize or pseudonymize where possible.
- Example: Use data anonymization techniques like tokenization or hashing to replace PII with non-identifiable values.
6. Compliance Monitoring and Reporting:
- Regular assessments: Assess and audit data protection measures periodically to ensure compliance.
- Example: Conduct security assessments, vulnerability scans, and penetration tests, and generate compliance reports.
By implementing these measures, organizations can mitigate the risk of data breaches, protect sensitive information, and maintain compliance with data protection regulations.
In JWT , what is the difference between basic and bearer token ?» The application needs to process and analyze large volumes of streaming data from IoT devices in real-time. Explain how you would architect a scalable and fault-tolerant stream processing pipeline using technologies such as Apache Kafka, Apache Flink, and Apache Spark Streaming.
1. Data Ingestion with Apache Kafka:
- Use Apache Kafka: Utilize Kafka as the data ingestion layer to collect and buffer streaming data from IoT devices.
- Partition and Replication: Configure Kafka topics for partitioning and replication across multiple brokers to ensure fault tolerance and scalability.
- Kafka Connect Integration: Employ Kafka Connect to integrate with IoT device protocols (e.g., MQTT, AMQP) and ingest data into Kafka topics efficiently.
- Example: IoT devices publish sensor data to Kafka topics via Kafka Connect connectors.
2. Stream Processing with Apache Flink:
- Deploy Apache Flink: Utilize Flink as the stream processing engine for real-time analytics and computations on streaming data.
- Custom Business Logic: Develop Flink jobs to consume data from Kafka topics, process it using custom logic (e.g., anomaly detection, pattern recognition), and emit results.
- Stateful Processing: Leverage Flink's stateful processing capabilities for aggregations, windowing, and event-time processing to handle time-based operations.
- Example: Flink job reads sensor data from Kafka topics, applies machine learning algorithms for anomaly detection, and generates alerts.
3. Batch Processing with Apache Spark Streaming:
- Hybrid Processing: Use Spark Streaming for hybrid batch and stream processing to handle real-time and historical data analytics.
- Spark Jobs: Develop Spark Streaming jobs to consume data from Kafka topics, process it using Spark transformations and actions, and store results in persistent storage.
- Resilience Features: Leverage Spark's resilience features for fault tolerance and data integrity.
- Example: Spark Streaming job aggregates sensor data from Kafka topics over fixed time intervals for trend analysis.
4. Data Visualization and Insights:
- Integration with Visualization Tools: Integrate visualization tools or custom dashboards to visualize real-time analytics results and provide insights to end-users.
- Interactive Visualizations: Create interactive charts, graphs, and alerts to monitor KPIs and detect anomalies or trends in streaming data.
- Example: Dashboards display real-time visualizations of sensor data trends for monitoring equipment status.
5. Monitoring and Management:
- Implement Monitoring Tools: Use monitoring and management tools to monitor the health, performance, and scalability of the stream processing pipeline.
- Proactive Alerting: Set up alerts and notifications to proactively detect and respond to issues such as data ingestion bottlenecks or processing delays.
- Example: Monitoring dashboard displays metrics for Kafka, Flink, and Spark components to identify and troubleshoot performance issues.
» In JWT , what is the difference between basic and bearer token?
In JWT (JSON Web Tokens), there is no concept of a "basic token". However, there is a concept of a "bearer token". Let's clarify both:
1. Basic Token- Basic Authentication is a method for sending a username and password with an HTTP request. It involves encoding the username and password as a base64 string and including it in the `Authorization` header of the HTTP request.
- The `Authorization` header typically looks like this: `Authorization: Basic
- Basic tokens are not JSON Web Tokens (JWTs). They are simply base64-encoded credentials (username and password) used for authentication.
2. Bearer Token- Bearer Authentication is a method for sending tokens with HTTP requests for authentication and authorization purposes.
- Bearer tokens are typically JSON Web Tokens (JWTs) but can also be other types of tokens.
- The `Authorization` header for a bearer token looks like this: `Authorization: Bearer
- Bearer tokens are often used for authorization purposes in modern web applications. Once a user logs in and obtains a bearer token, they include it in subsequent requests to access protected resources.
In summary, the main difference is that "basic tokens" are base64-encoded credentials used for basic authentication, while "bearer tokens" are used for authentication and authorization purposes, typically as JWTs.
Certainly! Here are short examples illustrating both Basic and Bearer token usage:
Basic Token Example
// Base64 encode the username and password
const credentials = 'username:password';
const base64Credentials = btoa(credentials); // "dXNlcm5hbWU6cGFzc3dvcmQ="

// Include the base64-encoded credentials in the Authorization header
const headers = {
  Authorization: `Basic ${base64Credentials}`
};

// Send an HTTP request with the Authorization header
fetch('https://api.example.com/data', {
  method: 'GET',
  headers: headers
});
In this example, the `Authorization` header contains the base64-encoded credentials for basic authentication.
Bearer Token Example
// Obtain the JWT bearer token
const token = 'eyJhbGciOiJIUzI1NiIsInR5cCI6IkpXVCJ9.eyJzdWIiOiIxMjM0NTc...';

// Include the bearer token in the Authorization header
const headers = {
  Authorization: `Bearer ${token}`
};

// Send an HTTP request with the Authorization header
fetch('https://api.example.com/data', {
  method: 'GET',
  headers: headers
});
In this example, the `Authorization` header contains the JWT bearer token for authentication and authorization purposes.
» What is Access token and refresh tokens?
Access tokens and refresh tokens are both components of the OAuth 2.0 protocol, which is widely used for securing web APIs. They serve different purposes in the authentication and authorization process:
Access Token:
- An access token is a credential used by an application to access protected resources on behalf of a user. It represents the authorization granted to the application by the user.
- Access tokens are short-lived and typically have an expiration time. They are issued by the authorization server after the user has authenticated and authorized the application.
- Once obtained, the access token is included in API requests to authenticate the user and grant access to the requested resources.
- Access tokens should be securely stored and transmitted to prevent unauthorized access.
Refresh Token:
- A refresh token is a long-lived credential used to obtain a new access token when the current access token expires or becomes invalid.
- Unlike access tokens, refresh tokens are typically not included in API requests. Instead, they are securely stored by the application and exchanged with the authorization server for a new access token when needed.
- Refresh tokens have a longer lifespan compared to access tokens, but they are still subject to expiration and revocation by the authorization server.
- The use of refresh tokens adds an extra layer of security by reducing the exposure of access tokens, as they are only used to obtain new access tokens and not directly for accessing resources.
» What Type interference in TypeScript?
Type inference in TypeScript means that the TypeScript compiler can figure out the type of a variable or the result of a function without you having to explicitly tell it what the type is.
let age = 25; // TypeScript knows 'age' is a number based on the value

// Later, if you try to assign something else to 'age' that isn't a number:
age = "twenty-five"; // This will give an error because TypeScript expects 'age' to always be a number.
In this example, you didn't have to write let age: number = 25; because TypeScript automatically knows that age is a number by looking at the value 25.
It makes your code cleaner and easier to write while still catching errors. For example, if you accidentally assign the wrong type to age, TypeScript will alert you.
» Axios request cancellation
Imagine you're making a request to get some data from a server, but before the server responds, you realize you don’t need that data anymore. Instead of waiting for the response, you can tell Axios to stop or "cancel" that request.
For that you need to create a token
Create a token: Token allows us to cancel the request later.
Make the request: While making the request, pass that token along with it.
Cancel the request: If you want to stop the request, call a function that cancels it.
import axios from 'axios';

// Step 1: Create a cancel token
const cancelSource = axios.CancelToken.source();

// Step 2: Make a request, passing the token
axios.get('https://api.example.com/data', {
  cancelToken: cancelSource.token
})
.then(response => {
  console.log(response.data); // If the request succeeds, this runs
})
.catch(error => {
  if (axios.isCancel(error)) {
    console.log('Request canceled:', error.message); // If we cancel the request, this runs
  } else {
    console.log('Other error:', error); // Handles other types of errors
  }
});

// Step 3: Cancel the request when needed
cancelSource.cancel('Request was canceled by the user.');
More articles, blogs and resources for your reference
Angular interview questions:
https://www.code-sample.com/2018/04/angular-7-interview-questions-and.html
https://medium.com/@vigowebs/frequently-asked-angular-interview-questions-and-answers-d996be87cc7c
Angular change detection:
What Are @HostBinding() and @HostListener() in Angular?
https://dzone.com/articles/what-are-hostbinding-and-hostlistener-in-angular
When to use Subject & BehaviourSubject
Subject vs BehaviourSubject (When to use Subject & BehaviourSubject with example)
Subject vs BehaviourSubject
I really enjoyed your blog Thanks for sharing and it was very usefully to me
ReplyDeleteMeanstack Online Training
Meanstack Training in Hyderabad
Meanstack Training in Ameerpet
Best Meanstack Online Training in Hyderabad
Sure. Thanks
ReplyDeleteVery nice post..After reading your post,thanks for taking the time to discuss this, I feel happy about and I love learning more about this topic.
ReplyDeleteOracle Training in Chennai | Certification | Online Training Course | Oracle Training in Bangalore | Certification | Online Training Course | Oracle Training in Hyderabad | Certification | Online Training Course | Oracle Training in Online | Oracle Certification Online Training Course | Hadoop Training in Chennai | Certification | Big Data Online Training Course
Great Content. It will useful for knowledge seekers. Keep sharing your knowledge through this kind of article.
ReplyDeleteMean Stack Training in Chennai
Go Lang Training in Chennai
Mean Stack Course in Chennai
Go Lang Course in Chennai
Mean stack Classes in Chennai
Go Lang Training Course in Chennai
Great Content. It will useful for knowledge seekers. Keep sharing your knowledge through this kind of article.
Mean Stack Training in Chennai
Go Lang Training in Chennai
Mean Stack Course in Chennai
Go Lang Course in Chennai
Mean stack Classes in Chennai
Go Lang Training Course in Chennai
Mean Stack Course in Gurgaon
ReplyDeletePCB & Circuit Design Training in Gurgaon
ReplyDeletecatia course in gurgaon
ReplyDeleteMean Stack Course in Noida
ReplyDeleteCATIA Training in Noida
ReplyDeleteThanks for this blog keep sharing your thoughts like this...
ReplyDeleteMean Stack Training in Chennai
Mean Stack Course in Chennai
Mean Stack Training in Noida
ReplyDeleteGreat Article.. Thank you for sharing..
ReplyDeleteFull Stack Online Training
Full Stack Training
Full Stack Developer Online Training
Full Stack Training in Hyderabad
Full Stack Training in Ameerpet
UI Developer Course
Full stack Development Online Course
Mean Stack Training Institute In Gurgaon
ReplyDeleteMEAN Stack Training in Delhi
ReplyDeleteNice Blog. Thanks for sharing with us..
ReplyDeleteAzure DevOps Online Training
Azure DevOps Training
Azure DevOps Online Training in Hyderabad
Azure DevOps Training Online
MEAN Stack Training in Gurgaon
ReplyDeletehttps://bumppy.com/tm/read-blog/45182_things-when-you-first-start-mean-stack.html
If you are a working professional, looking forward to up-skilling yourself and obtaining specialization, APTRON weekend classes will enable you. We have specific software development classes on topics like MEAN Stack. Achieve your next career break with these specialization classes offered in APTRON, India’s best institute for MEAN Stack Training in Gurgaon.
Excellent content. It will be beneficial to those who seek MEAN stack development information to deliver website and web applications to transform your website into a productive business with MEAN stack development services.
ReplyDeleteIt's Really Nice Article!! Thank you for sharing this Information.
ReplyDeleteAzure DevOps Online Training
Azure DevOps Training
Azure DevOps Online Training in Hyderabad
Azure DevOps Training Online
MEAN Stack course in Noida
ReplyDeletehttps://aptronsolutions.home.blog/2022/08/04/mean-stack-institute-in-noida-mean-stack-training-in-noida/
ReplyDeleteMean Stack Training Course in Gurgaon
Nice post. I'm looking forward to reading the next one.
ReplyDeletebetmatik
betpark
casino siteleri
sms onay
takipci satin al
betgaranti
Good content. You write beautiful things.
ReplyDeletevbet
sportsbet
taksi
sportsbet
mrbahis
korsan taksi
hacklink
vbet
mrbahis
I read your Blog, it's so Knowledgeable and Accurate with the Topic you suggested as "Avail Node JS Certification Course ''. We also have a Avail Node JS Certification Course at KVCH. If you want to see more Content Visit our Site to Know more
ReplyDeleteI read this post of yours very nice and very informative. This post is best to prepare yourself well in advance for a Mean Stack Developer interview. Thanks for sharing this comprehensive post.
ReplyDeleteHello, Thanks for your Awesome post! I quite Satisfied reading it, you are a good author.I will Make sure to bookmark your blog and definitely will come back from now on. I want to encourage that you continue your great job, have a nice day.
ReplyDeleteADF Training In Hyderabad
ADF Online Training
ADF Training
ADF Training Online
Hello, Thanks for your Awesome post! I quite Satisfied reading it, you are a good author.I will Make sure to bookmark your blog and definitely will come back from now on. I want to encourage that you continue your great job, have a nice day.
ReplyDeletePower BI Training In Hyderabad
Power BI Online Training
Power BI Training In Ameerpet
slot siteleri
ReplyDeletekralbet
betpark
tipobet
mobil ödeme bahis
betmatik
kibris bahis siteleri
poker siteleri
bonus veren siteler
WAF8DQ
Hey author this is really very good article about Mean Stack Developer . and currently I'm also doing MERN stack web development course in kolkata .I'm grateful that you shared this fantastic information with us. I found this information to be of great value. This article has increased my knowledge even more.
ReplyDeleteThank you ...
This comment has been removed by the author.
ReplyDeleteThis is a really very good article about Mean Stack . I am also done MERN stack course in kolkata. an web developer is an excellent career to choose. I appreciate you sharing this amazing article with us . this article is very helpful to everybody who learn mean stack.
ReplyDeleteThanks for sharing this informative article on Mean Stack Interview Questions and Answers. If you want to hire mean stack developers for your project. Please visit us.
ReplyDeletemanisa
ReplyDeletemaraş
mardin
marmaris
mersin
FP4SXZ
MERN stack is trending skills in the market. You can travel through GoMetro
ReplyDeleteدهان سيليكات
ReplyDeleteدهان
nice article
ReplyDeletethaks for sharing with us
Azure data Factory taining in hyderabad
This comment has been removed by the author.
ReplyDeleteReally appreciate you sharing these great insights!
ReplyDeleteRheumatoid arthritis
nice article
ReplyDeleteNice info. Thank you for sharing.
ReplyDeletehttps://fabricexperts.in/
Fabrice Experts provides high-quality digital marketing, branding, and business growth solutions designed to help startups and small businesses stand out and scale with confidence.